The 20 integrations on the connection screen, one by one: what you need before you start, the steps with a screenshot of the real screen, and what to do when something won't hook up.
Where to start3 steps
Open the connection screenFrom the ☰ menu → Add device, or from the DEVICES card on the Dashboard. It's the same screen either way.The connection screen →
Pick your brandThe three most-used plugs are at the top. Further down, advanced grow control and the community integrations. If you're not sure which one, check the comparison.Which brand should I get →
Assign zone and roleEvery setup ends the same way: you pick which tent the device goes in and what it does there — light, exhaust fan, pump. The role is what gives it meaning: without a role, the equipment is just a dumb plug.Zone and role: how every setup ends →
01 · The screenBASIC
The connection screen
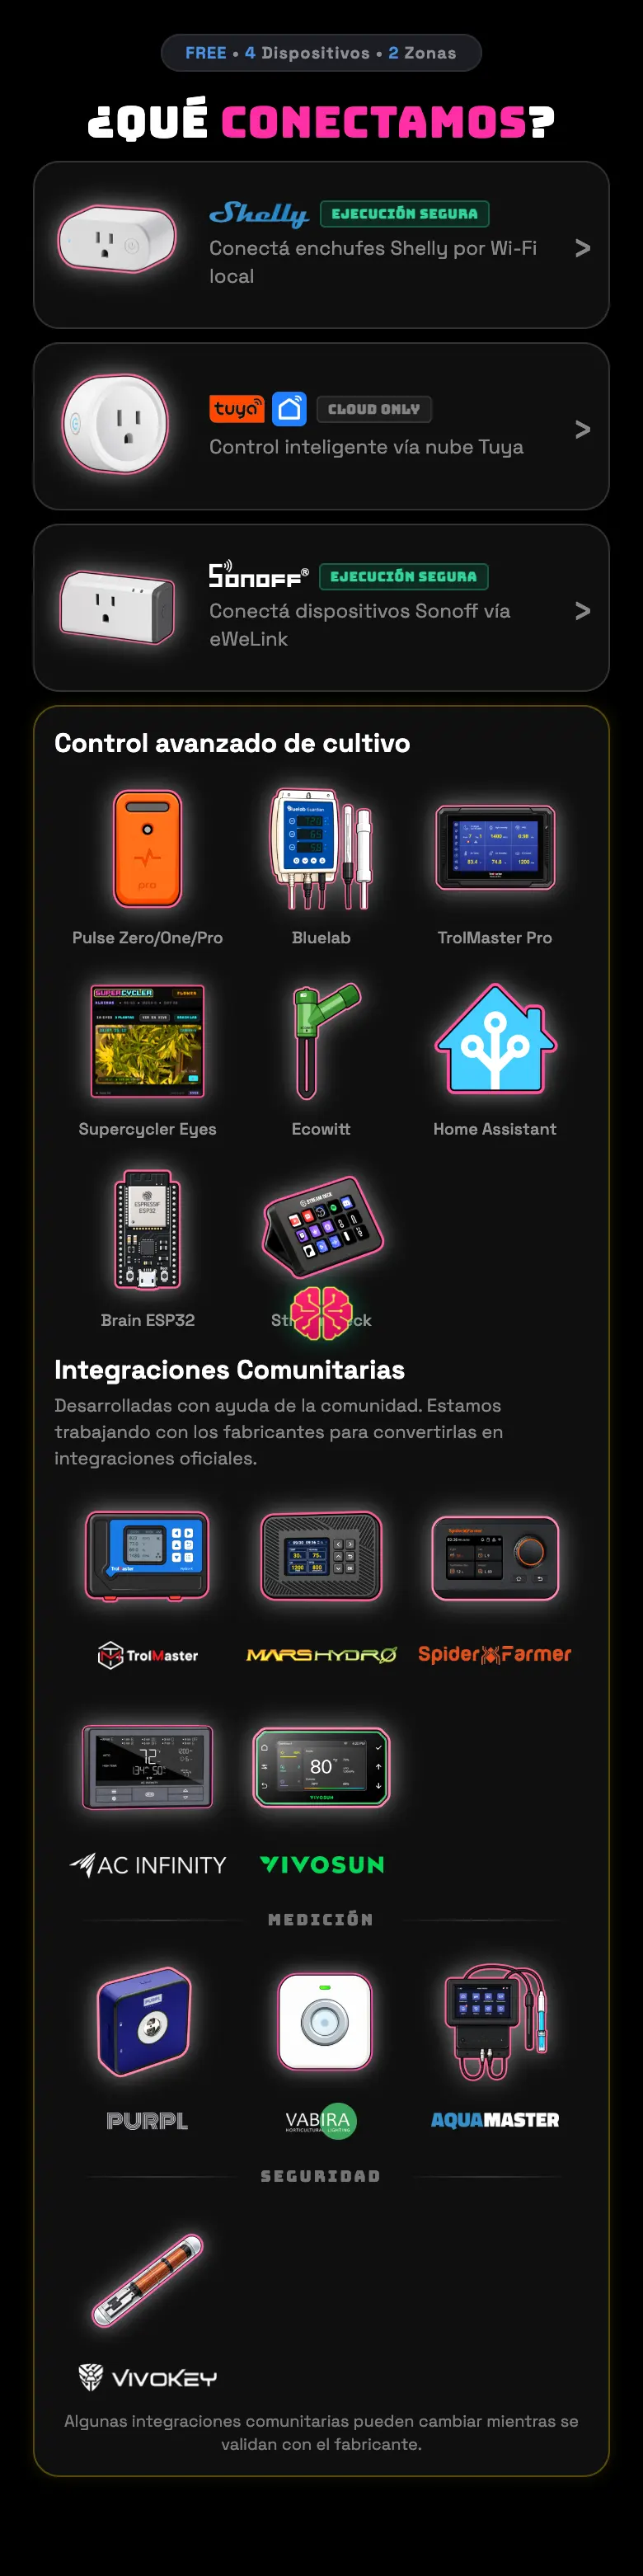
Every setup starts in the same place. The screen groups the brands by how they're used, not alphabetically: at the top the three plugs that cover 90% of cases, then advanced control, and at the end the integrations we built with help from the community.
01Open the ☰ menu and tap Add device. You can also get there from the + Connect device button on the DEVICES card on the Dashboard.
02Pick the brand. Each card opens its own path: some ask for the username and password of the manufacturer's app, others for a code, others for scanning a QR.
03However you get there, you'll end up picking a zone and a role. That part is the same for all of them.
FIG 01 · The full connection screen. The three plugs at the top, advanced control in the middle, the community ones at the bottom.
The five groups
Plugs
Shelly, Tuya and Sonoff. These are the ones that turn things on and off: lights, pumps, exhaust fans. If you have to pick just one, pick from here.
Advanced grow control
Sensors and serious grow gear: Pulse, Bluelab, TrolMaster Pro, the Eyes camera, Ecowitt, Home Assistant, our own ESP32 board and the Stream Deck.
Community integrations
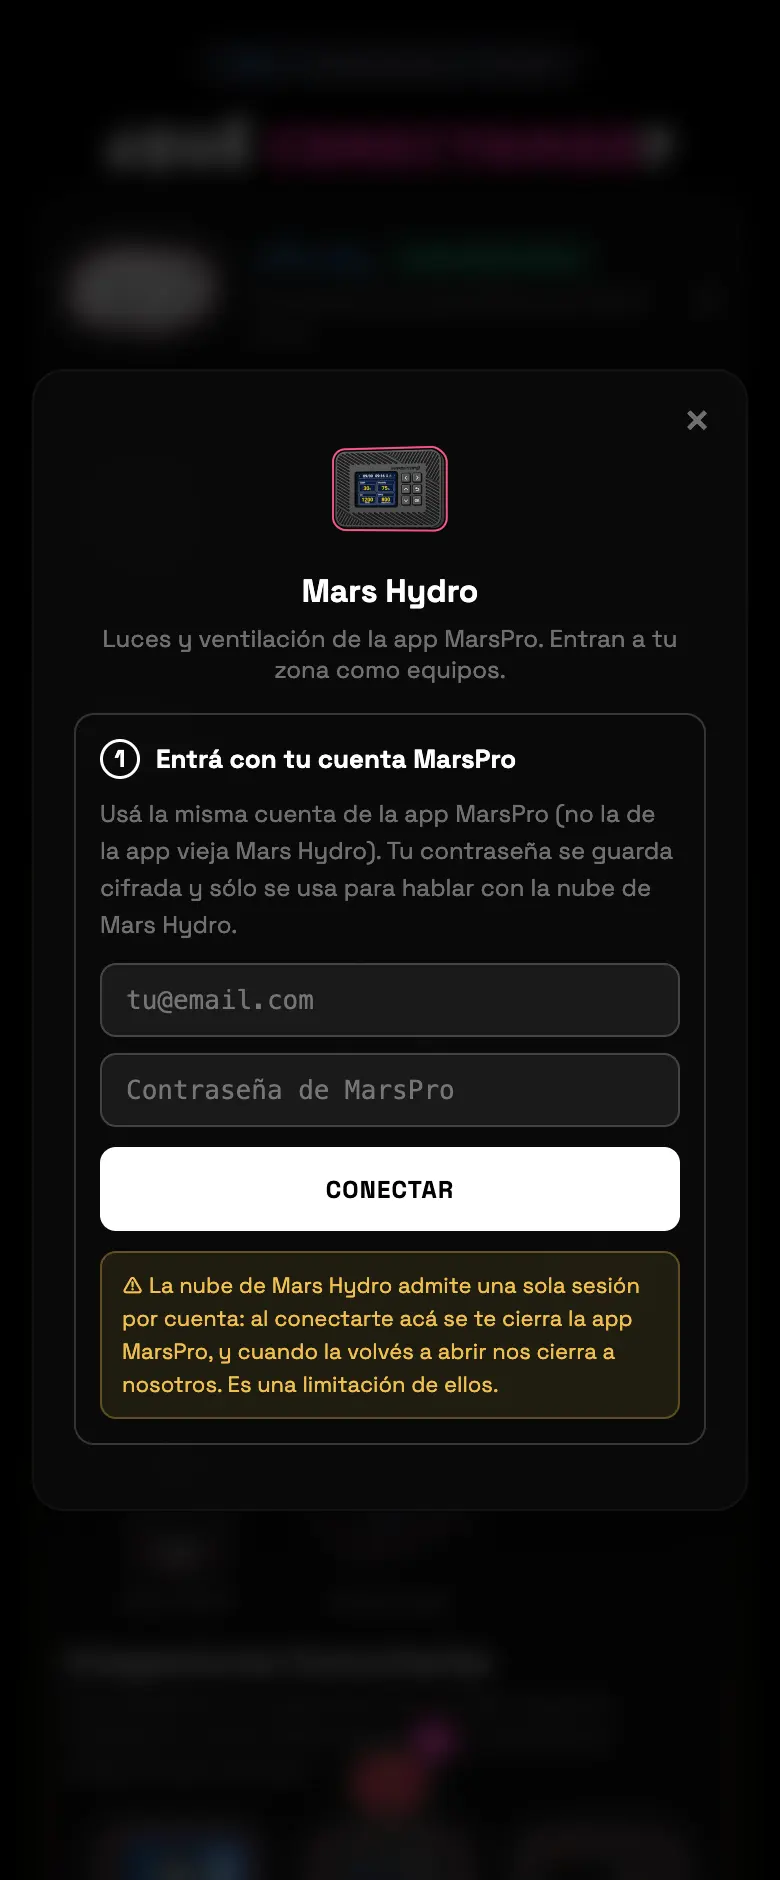
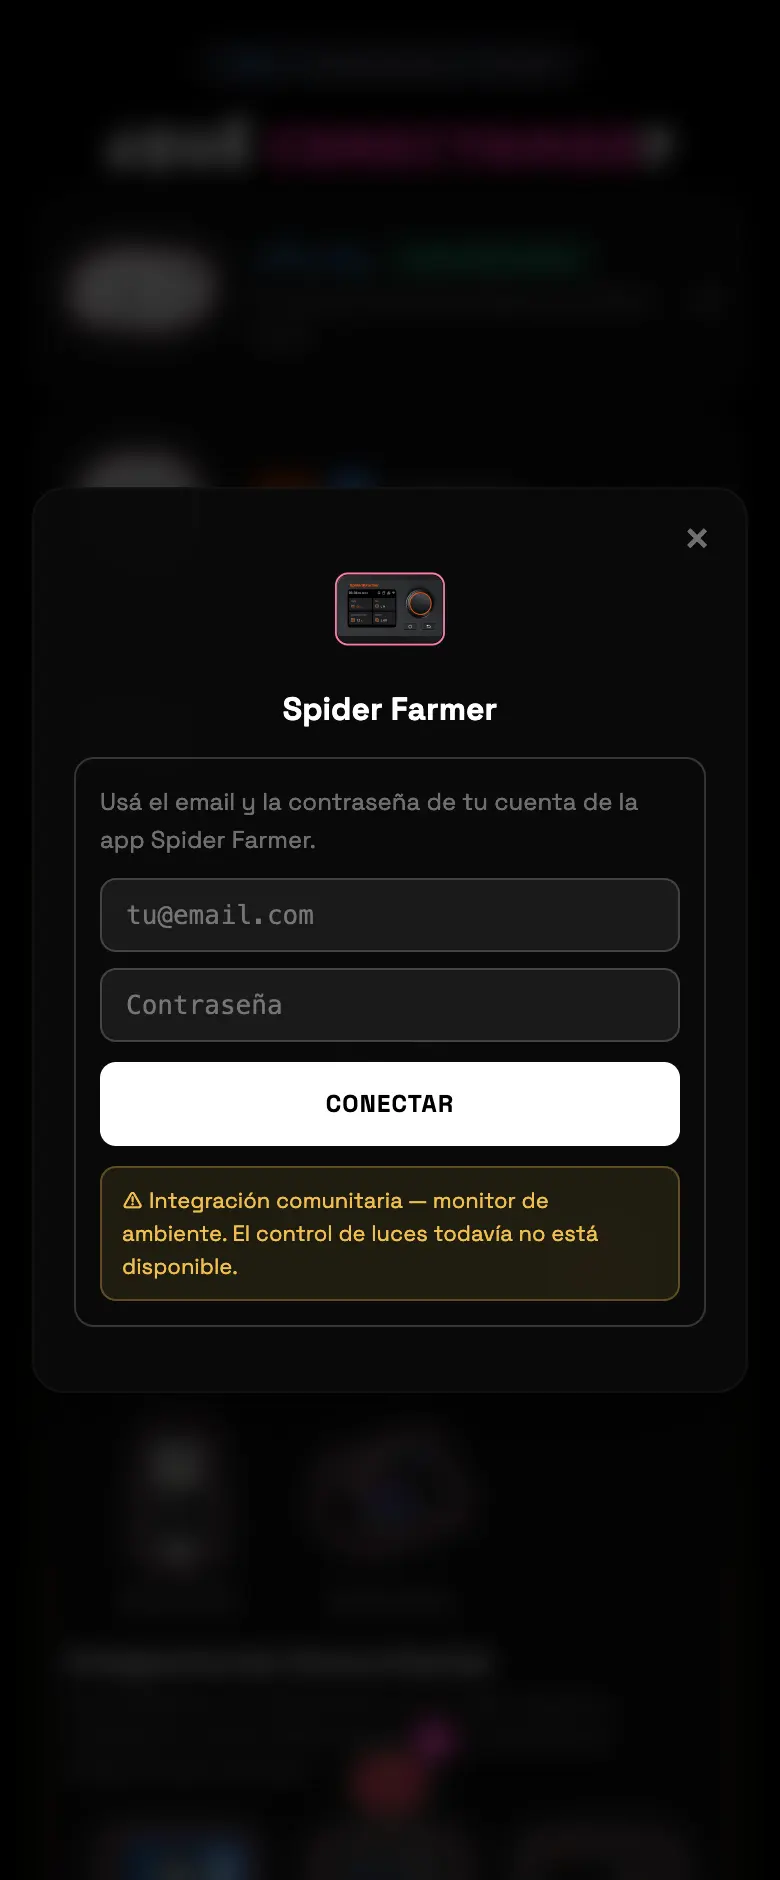
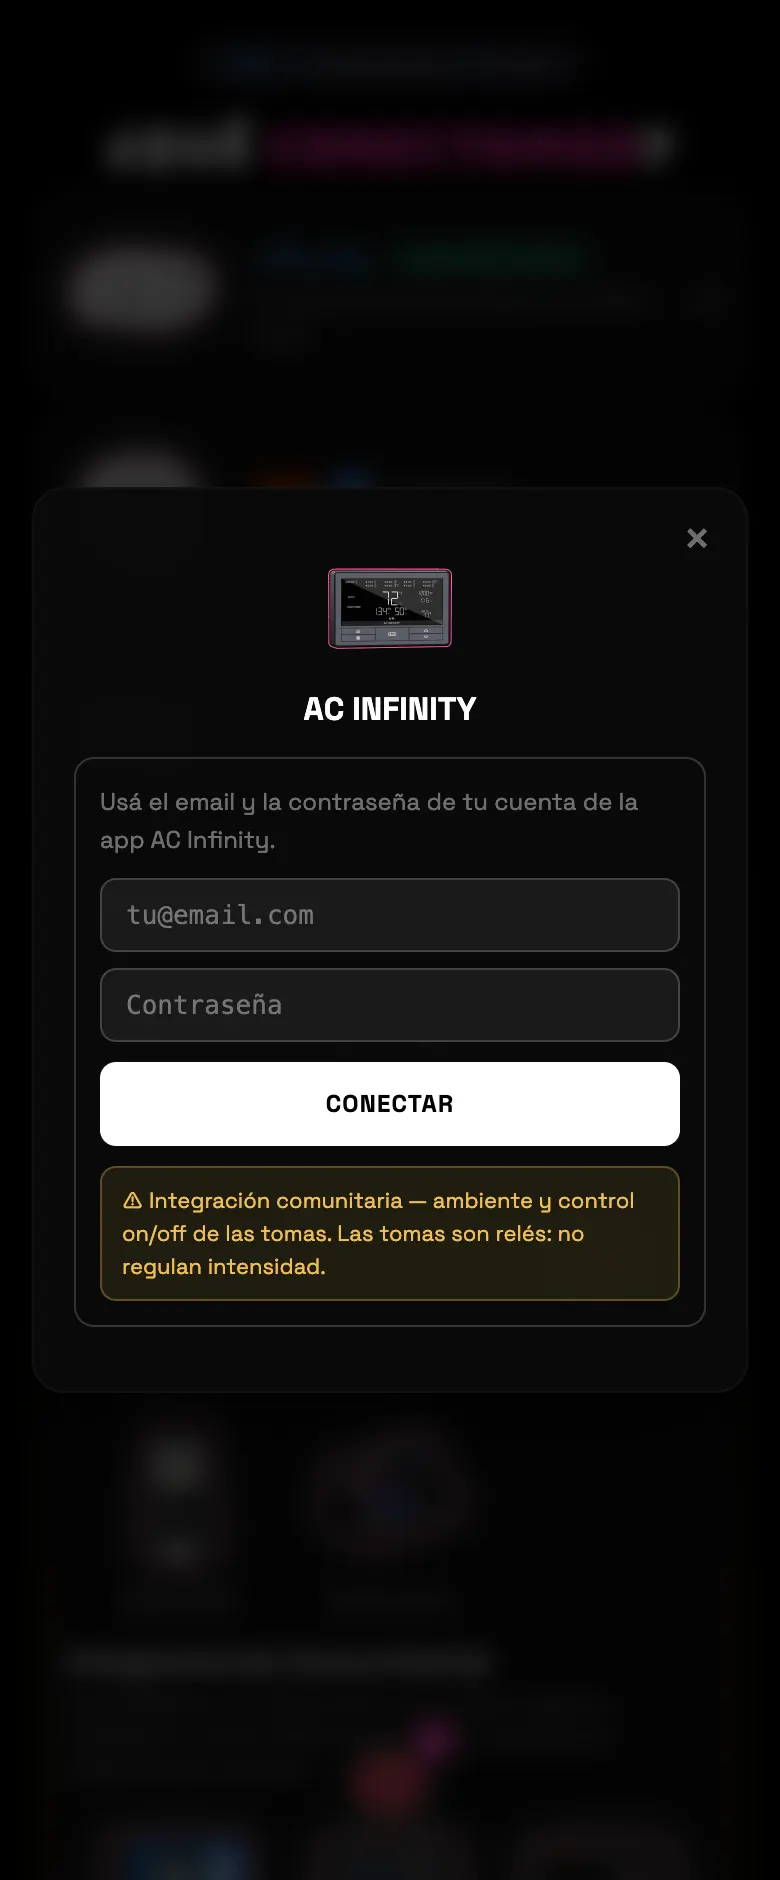
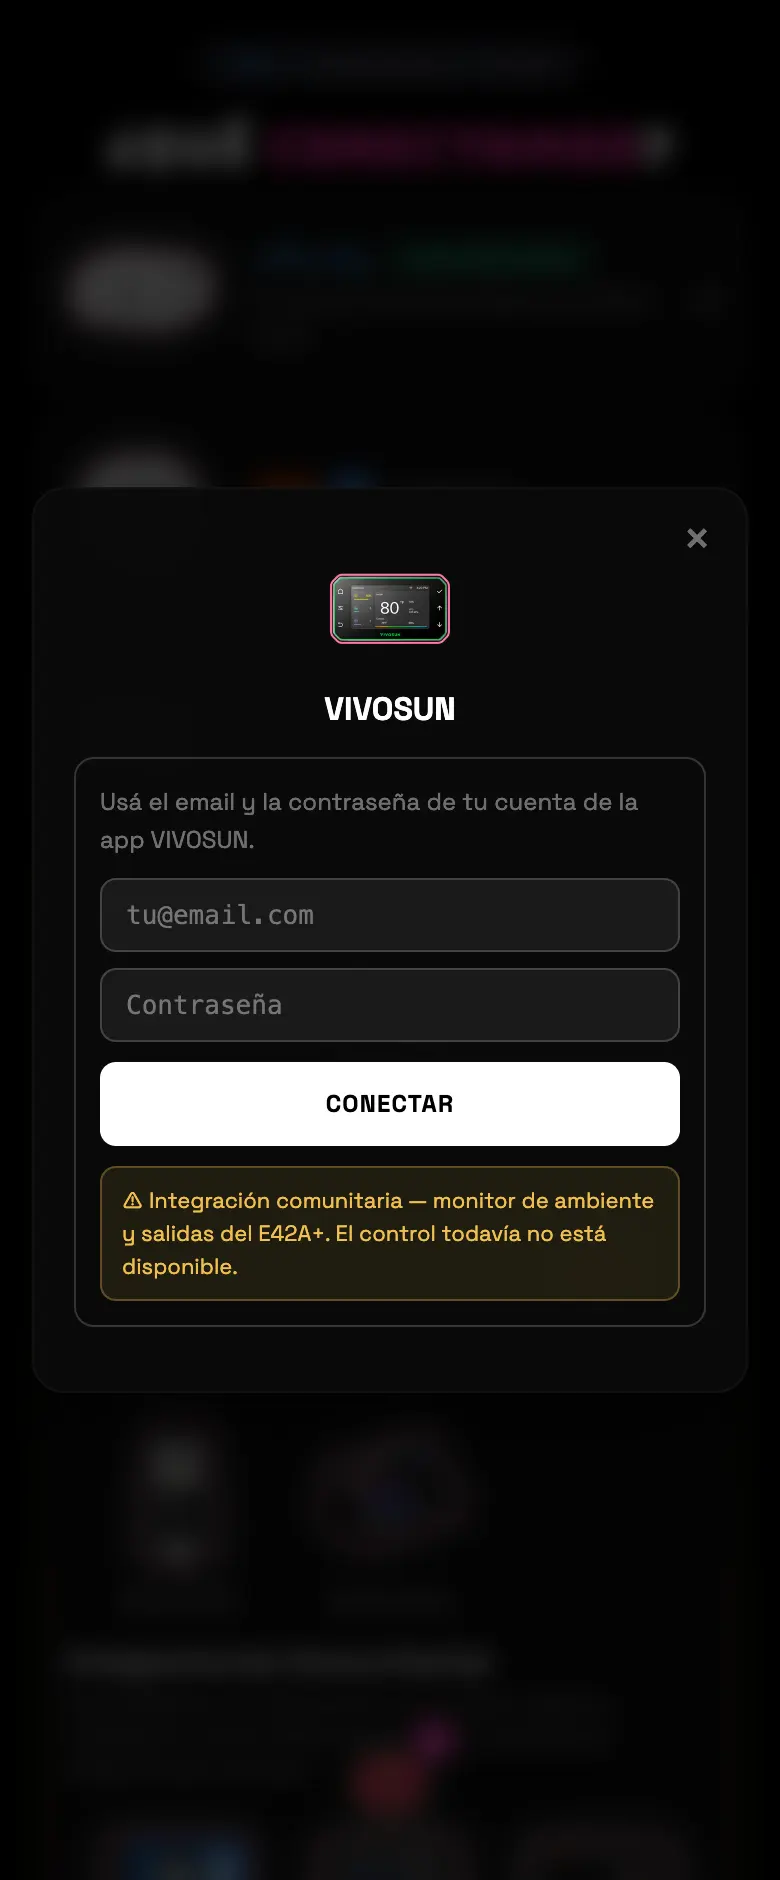
Controllers from grow brands — TrolMaster, Mars Hydro, Spider Farmer, AC Infinity, VIVOSUN. We built them by reading their clouds, not through a signed agreement: they work, but they can change whenever the manufacturer touches something.
Measurement
Purpl Pro (THC/CBD), VABIRA (PAR meter) and Aqua Master (pH/EC). They only read: they don't control anything.
Security
The VivoKey implant, which is a way to log into the app, not a piece of equipment in the tent.
Do this
Connect the light first. It's the device everything else hangs off — the grow day, synced irrigation, the night thresholds.
Avoid this
Don't add ten things at once. Connect one, check that it responds with the test button, and only then move on to the next. That way, if something goes wrong, you know which one it is.
How urgent it is
EssentialOne device connected and responding.
ImportantThe right role on each one.
OptionalWhatever other brands you have.
02 · ComparisonBASIC
Which brand should I get
The difference that matters most isn't the brand: it's whether the device only measures or also takes orders. A sensor shows you numbers; a plug turns off your pump for you. And among the ones that take orders, only some know how to dim instead of just turning on and off.
All 20, in one table
Brand
What you need
Reads
Controls
Shelly
The app, or the device's IP on your network
Yes
Yes
Tuya / Smart Life
Your user code + scanning a QR
Yes
Yes
Sonoff / eWeLink
Signing in with your eWeLink account
Yes
Yes
Pulse Zero/One/Pro
An API key from the Pulse portal
Yes
No
Bluelab Connect
An API key
Yes
No
TrolMaster Pro
An API key from developer.trolmaster.com
—
No
Supercycler Eyes
An old phone, or an IP camera with FTP
Yes
No
Ecowitt
Entering an address in WS View Plus
Yes
No
Home Assistant
HACS + pasting a configuration string
Yes
No
Brain ESP32
Flashing the firmware onto the board
Yes
Yes
Stream Deck
Download the plugin and double-click it
Yes
Yes
TrolMaster Hydro-X
Sharing the controller with us from their app
Yes
Only the TCS-1 light
Mars Hydro
MarsPro username and password
Yes
Yes, and it dims
Spider Farmer
Their app's username and password
Yes
Yes, and it dims
AC Infinity
Their app's username and password
Yes
Yes
VIVOSUN
Their app's username and password
Yes
Yes, and it dims
Purpl Pro
The phone app + signing in with your account
Yes
No
VABIRA VBR-100
The app + Bluetooth turned on
Yes
No
Aqua Master C800
Aqua Master Tools username and password
Yes
No
VivoKey Spark 2
The implant + an Android with NFC
—
No
Which ones know how to dim
Really dim: Mars Hydro, Spider Farmer (per output), VIVOSUN (the light output) and TrolMaster TCS-1.
AC Infinity dims only with the Controller 89 ("AI+"). On the WT5MK the outlet is a dry relay: on or off, nothing in between.
Everything else is on and off. A smart plug with a light hanging off it won't take it down to 40 %: it cuts the power or lets it all through.
Variable fan speed: today, only VIVOSUN.
Do this
For whatever can't fail, pick a brand from the top row: Shelly or Sonoff, which also know how to turn themselves off if the internet drops.
Avoid this
Don't buy a brand just because it's on the list. Check first whether it controls or only reads: half the list is sensors and they're not going to move an exhaust fan.
How urgent it is
EssentialKnowing whether what you have controls or only measures.
ImportantA reliable plug on the pump and on the light.
OptionalAdding the grow sensors.
03 · Zone and roleBASIC
Zone and role: how every setup ends
It doesn't matter which brand you came in through: the last two steps are always the same. First you say which tent the device is in, then what it does there. The role is what turns a plug into a light or into a pump.
01If you only have one zone, the app assigns it itself and doesn't even ask.
02With two or more zones it asks you which one, with the one you already had open checked.
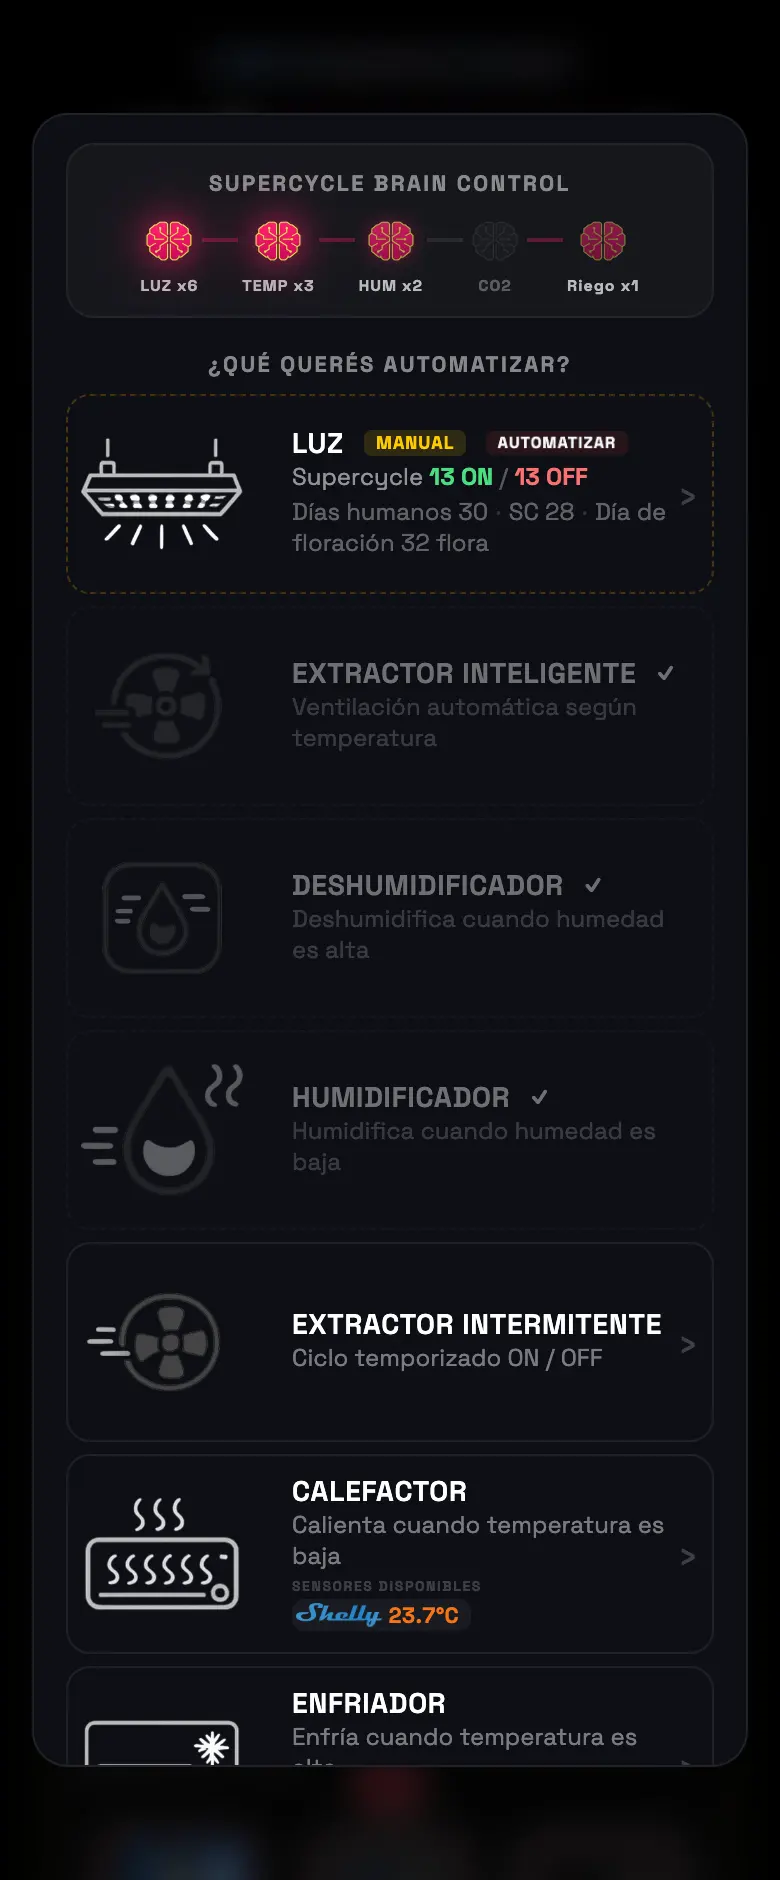
03Then the role menu comes up. Pick the one that applies: light, exhaust fan, intake fan, fan, humidifier, dehumidifier, heater, cooling, CO₂ injector or pump.
04If you pick light, you enter the schedule right there. If you pick pump, the irrigation circuit builder opens.
FIG 02 · The role menu. It's the same screen for every brand.
Two cases that skip the menu
The Sonoff SWV valve assigns itself as a valve: the role menu has no valve among the options, so the app sets it itself and sends you straight to the Dashboard.
Spider Farmer outputs don't ask either: the firmware already says which one is a light and which one is an exhaust fan, and the app takes it from there.
Do this
Give it a name you'll recognize. "Small tent exhaust fan" makes sense six months from now; "WIFI Smart Plug 3" doesn't.
Avoid this
Don't leave a device without a role planning to set it later. With no role it doesn't go into any automation: it stays a loose button you flip by hand.
How urgent it is
EssentialRight zone and right role.
ImportantAn understandable name.
OptionalReordering the Dashboard cards.
04 · ShellyBASIC
Shelly
The most reliable one for whatever can't fail. It's the only one that, on top of obeying over the internet, knows how to turn itself off: we write a timer into the device itself, so if your house power, your WiFi or our server goes down, the pump turns off anyway. That's what the app calls Secure Run.
01Pick Shelly on the connection screen.
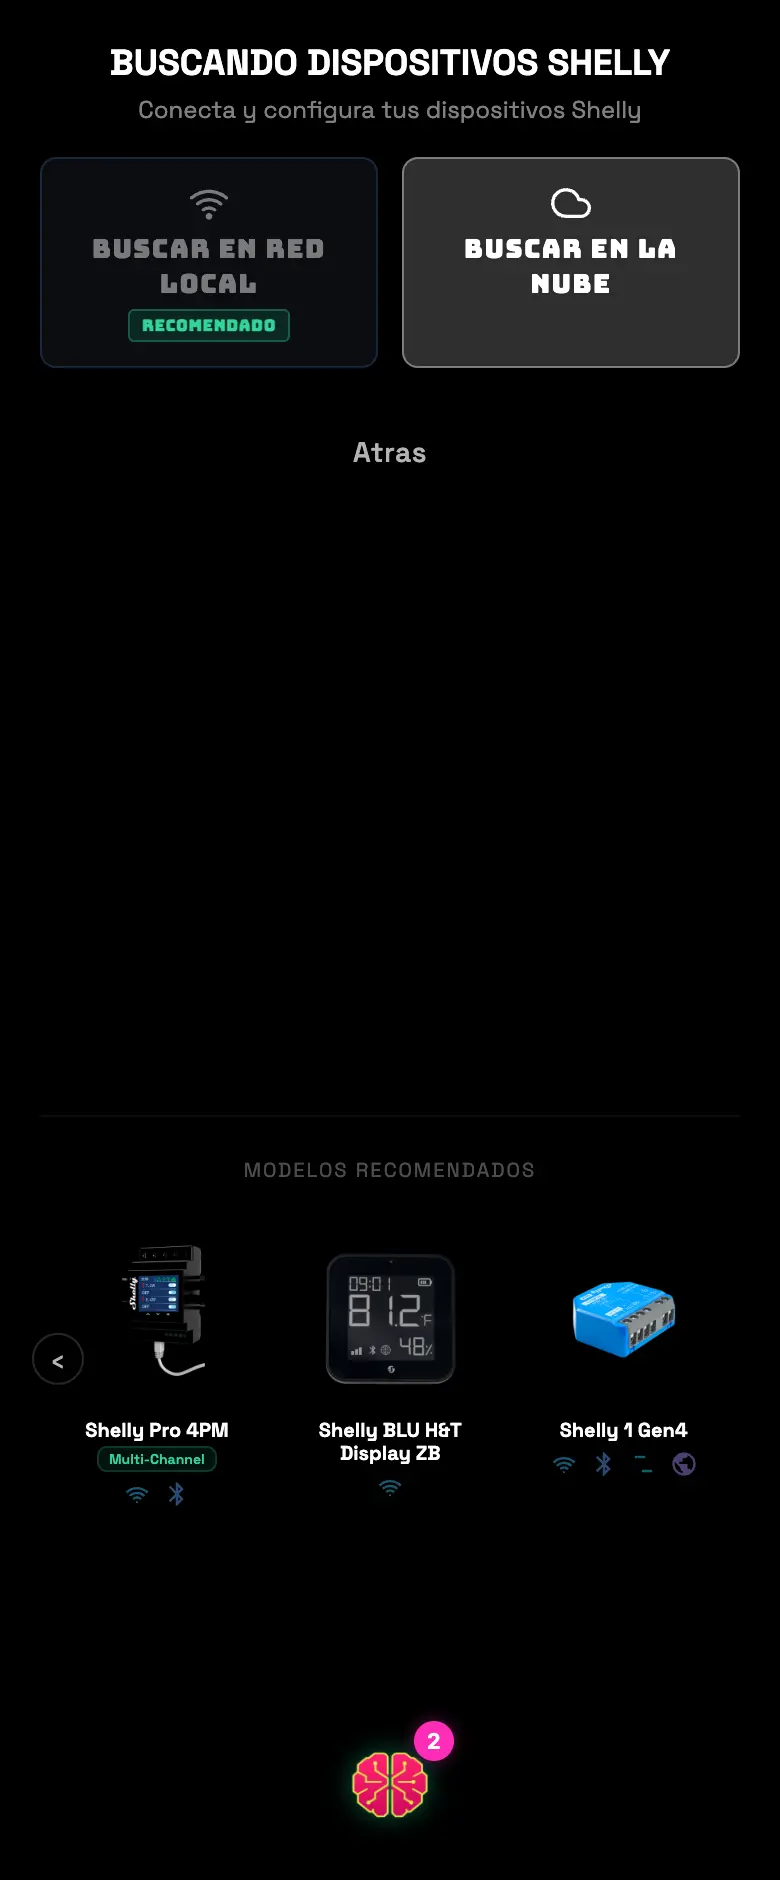
02Pick how to look for it: local network (recommended) or the cloud.
03Over the local network, the app scans your WiFi and lists the Shellys it finds. If none show up, you can type the device's IP in by hand.
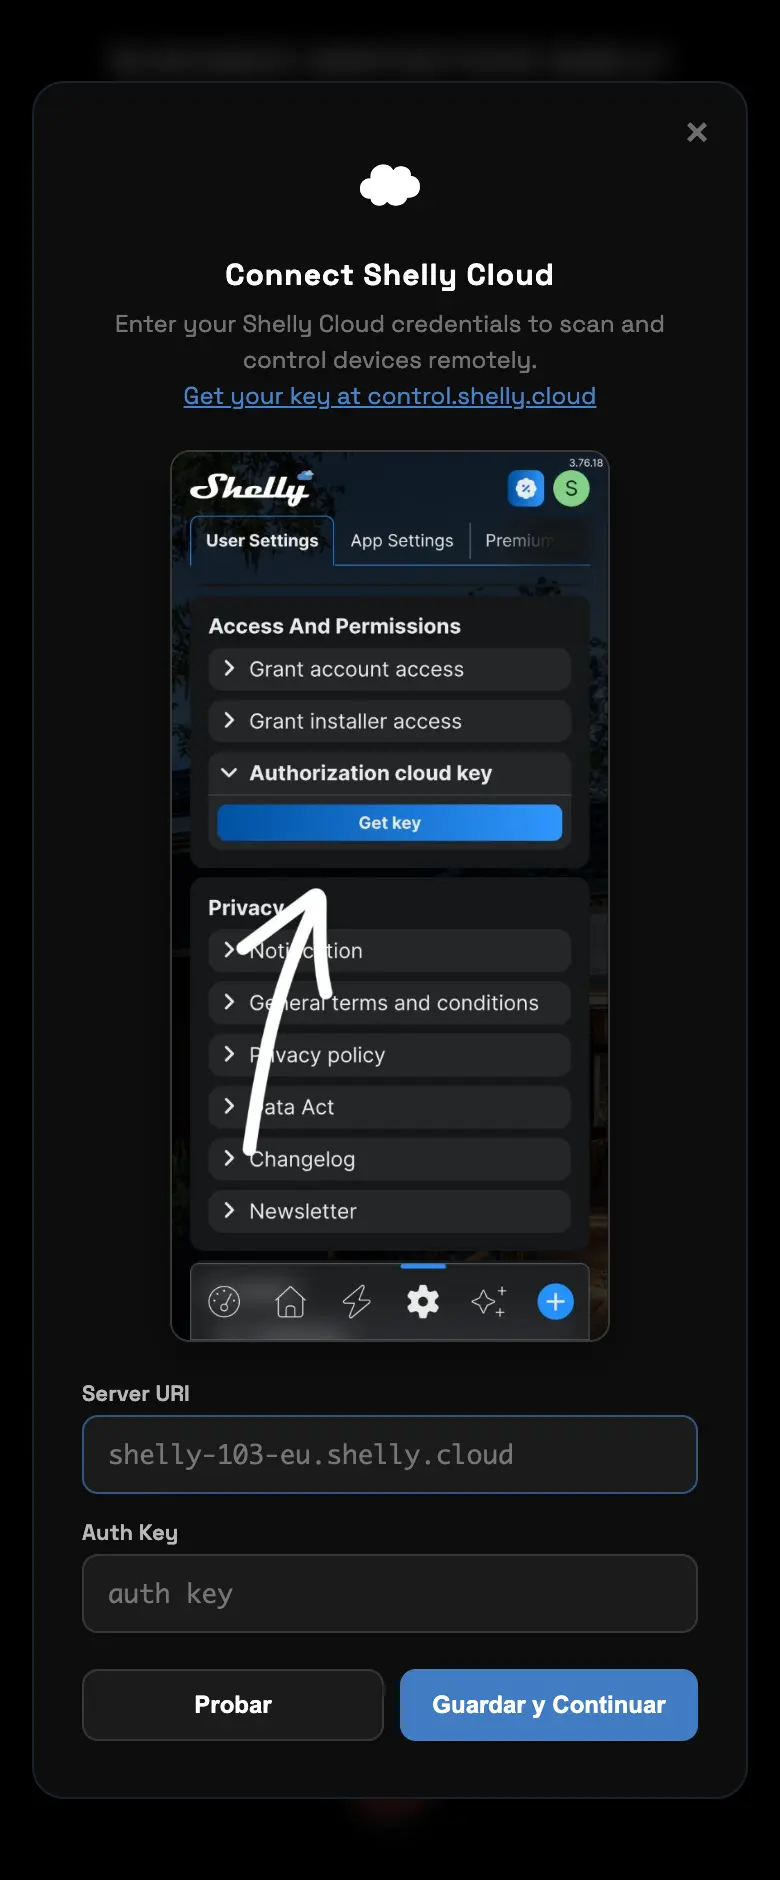
04Over the cloud, it asks you for the Server URI and the Auth Key from your Shelly account.
05Tap the device, give it a name and pick the role. If it's a light, you enter the schedule right there.
06Test it with the on and off button before you finish.
FIG 03a · The two paths: local network or cloud.FIG 03b · Over the cloud it asks you for the credentials, with a screenshot of where to get them in the Shelly app.
Where do I get the Auth Key
In the Shelly app: Settings → User Settings → Authorization cloud key.
The Server URI is right there too — an address like shelly-103-eu.shelly.cloud. Copy both.
Common errors
What you see
What happened
What to do
It finds nothing on the local network
The phone is on a different network than the Shelly, or you're in the browser
Connect the phone to the same WiFi, or type the IP in by hand
“This Shelly is an environment sensor”
It's an H&T or HTG3: it measures, it doesn't switch anything
You still add it, but as a sensor — don't look for a light role on it
“Already registered”
The same device is on another Supercycler account
Delete it from the old account first
You've hit the device limit
The free plan goes up to 4
Free up one you're not using or wait for the plan upgrade
Do this
Leave Secure Run on, especially on the pump. It's the difference between an internet outage and a flooded tent.
Avoid this
Don't give an H&T a light role. It's a thermometer: it has no relay to turn on.
How urgent it is
EssentialThe device responds to the test button.
ImportantSecure Run active on the pump and the light.
OptionalThe H&T sensors from the same brand.
05 · TuyaBASIC
Tuya / Smart Life
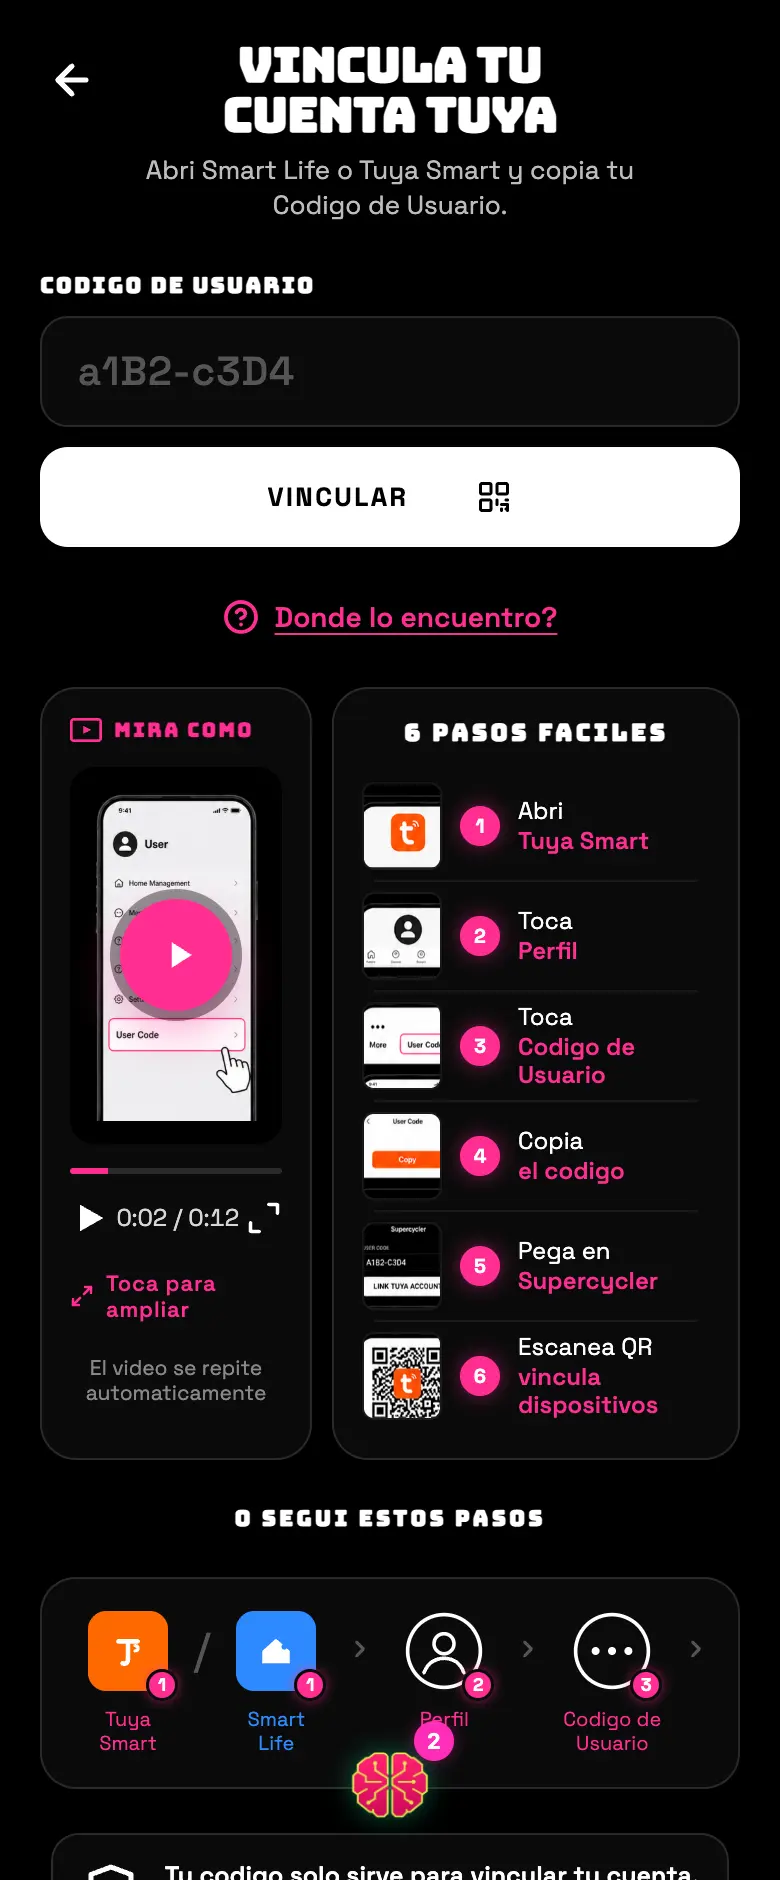
The widest catalog of them all: plugs, sensors, LED strips, valves, dehumidifiers and even the air conditioner over infrared. Tuya and Smart Life are the same cloud under two names — either app works. Everything goes over the internet: if the Tuya cloud goes down, there's no local plan B.
01Open the Tuya Smart or Smart Life app on your phone and go to Me.
02Copy your User Code — it's a short string like a1B2-c3D4.
03In Supercycler pick Tuya, paste that code and tap LINK.
04A QR code appears. Go back to the Tuya app, tap the + at the top right, pick Scan and point it at the QR on the screen.
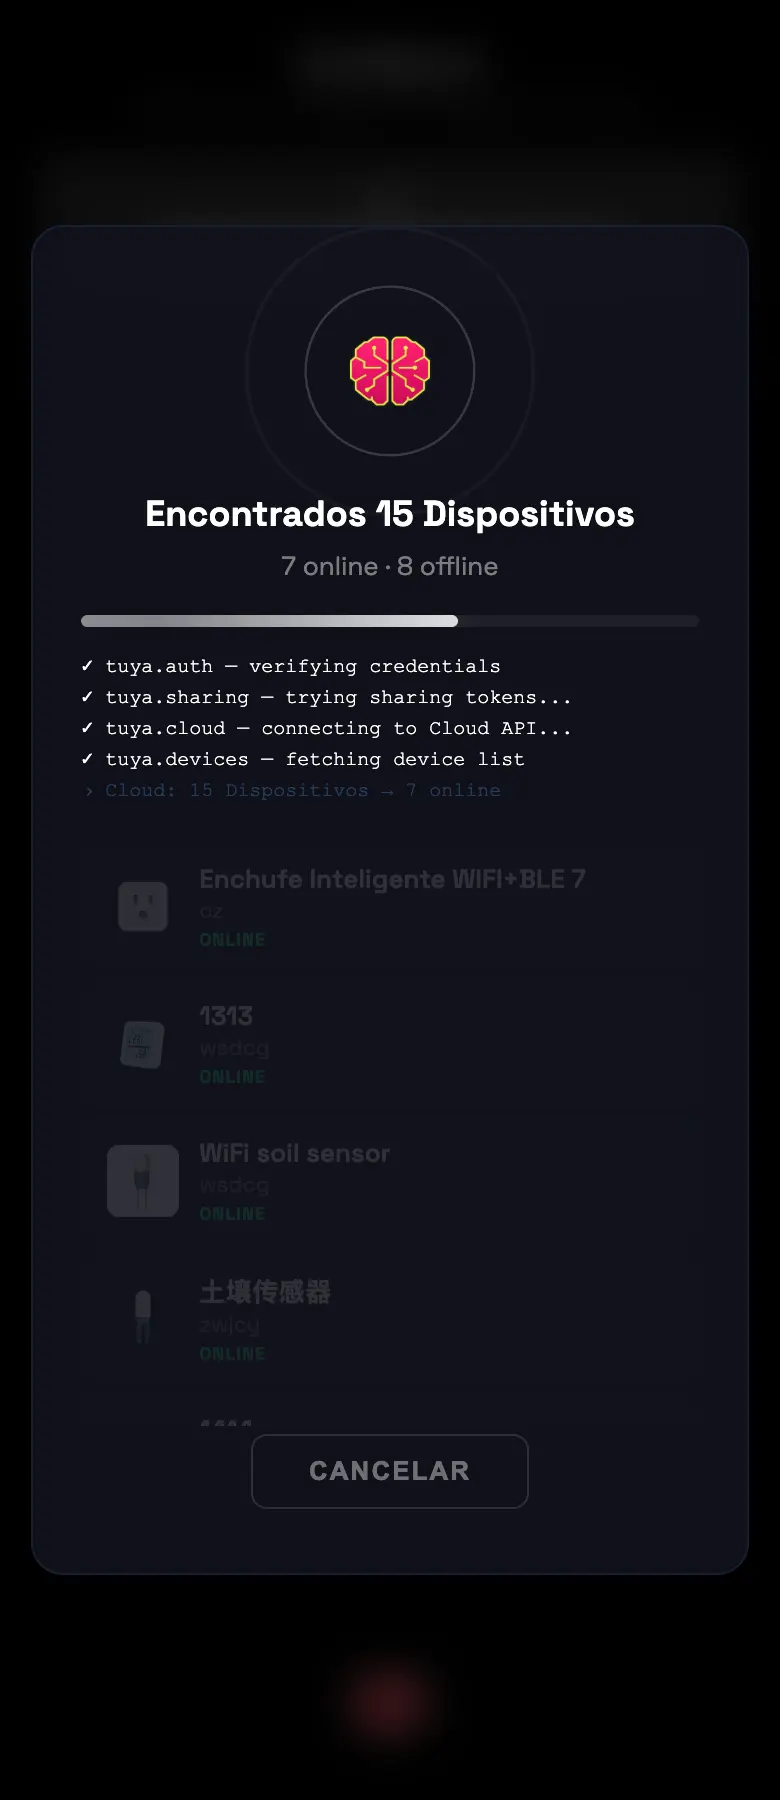
05Accept the authorization on your phone. In a few seconds the list of your devices shows up on its own in Supercycler.
06Tap ASSIGN on the one you want, pick zone and role.
FIG 04a · The linking screen comes with the video and the six illustrated steps for where to get the code.FIG 04b · Once the account is linked, the equipment shows up on its own.
Common errors
What you see
What happened
What to do
“Your Tuya session expired”
The authorization expired
Link again starting from the code step
“Your Tuya account has no home created”
The Tuya app requires you to create a "home" before you can have devices
Create the home in the Tuya app and try again
“We couldn't find any equipment”
The account is empty or everything is offline
Check in the Tuya app that they show as online
The QR never goes through
You scanned but didn't accept the authorization
Scan again and accept the prompt that comes up on your phone
It turns on and off by itself at odd hours
It has a schedule loaded in the Tuya app
Delete it from the Tuya app, in that device's settings
Do this
Save your user code: if you ever have to link again, it'll ask you for it again.
Avoid this
Don't leave schedules loaded in the Tuya app. They'll fight with the Supercycler schedule and the device will do things you didn't ask for.
How urgent it is
EssentialAccount linked and equipment listed.
ImportantOld schedules deleted from the Tuya app.
OptionalThe air conditioner over infrared.
06 · SonoffBASIC
Sonoff / eWeLink
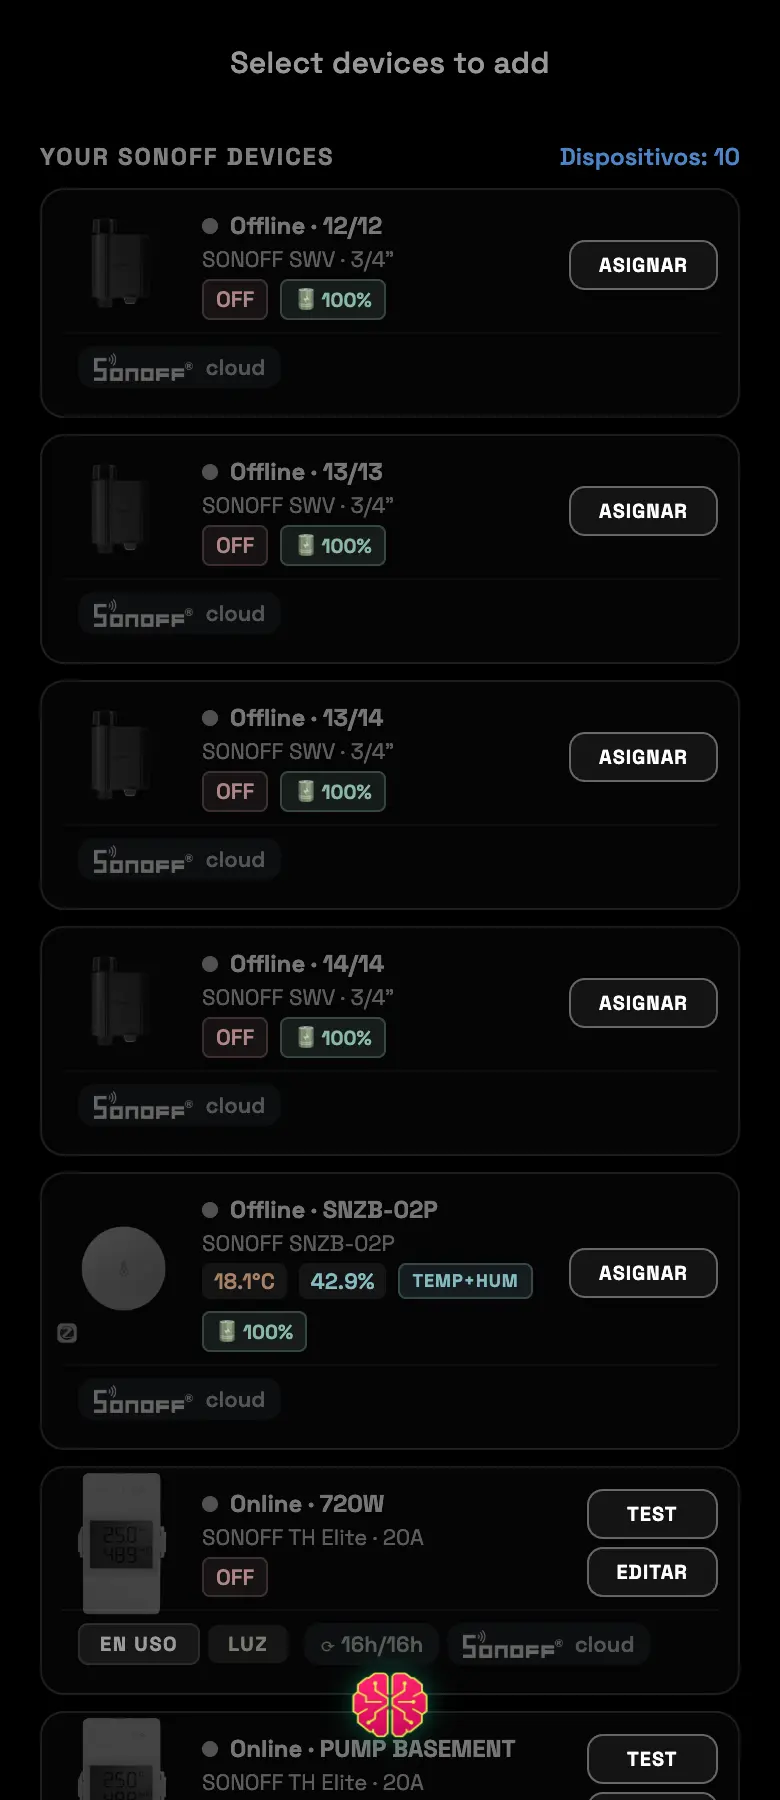
The other one that knows how to turn itself off: it lets us write timers into the device itself. It also has the SWV irrigation valve, the only hardware on the whole list designed for water. To add it you sign in with your account, no codes to copy.
01Pick Sonoff on the connection screen.
02A window opens with the official eWeLink login. Sign in with your username and password — you type the password on their page, we never see it.
03Once you accept, the window closes on its own and takes you back to Supercycler with your devices listed.
04Tap ASSIGN, pick a zone and a role.
FIG 05 · The eWeLink device list, with the status and battery level of each one.
Two things only Sonoff does
The SWV valve
It assigns itself as a valve, without asking you for a role. It's hardware built for water, not a plug with a hose next to it.
Importing the schedule you already had
If the device already came with a cycle loaded in the eWeLink app, the app shows it to you and offers to import it instead of overwriting it. You can adjust the day of the cycle before accepting.
Common errors
What you see
What happened
What to do
The login window doesn't open
The pop-up blocker killed it
Allow pop-ups for the site and try again
“Authentication error”
The authorization expired while you were filling it in
Start over from the beginning
“No devices found”
The eWeLink account is empty
Check that the devices are in that account and online
The card is dimmed
Setups paused because of quota
Wait for it to reset; whatever is already connected keeps running
Do this
If you're going to water, the SWV valve is the right option. A plug with a pump is a workaround; the valve is irrigation hardware.
Avoid this
Don't delete the device from the eWeLink app after you add it. The connection still goes through the manufacturer's account.
How urgent it is
EssentialAccount connected and devices listed.
ImportantSecure Run active.
OptionalImport the schedule you already had loaded.
07 · PulseBASIC
Pulse Zero / One / Pro
Professional environment sensor. It gives you temperature, humidity, VPD and — on the Pro — CO₂, light and spectrum. It only measures: it doesn't actuate anything. Setup is the shortest of all because it's a single key.
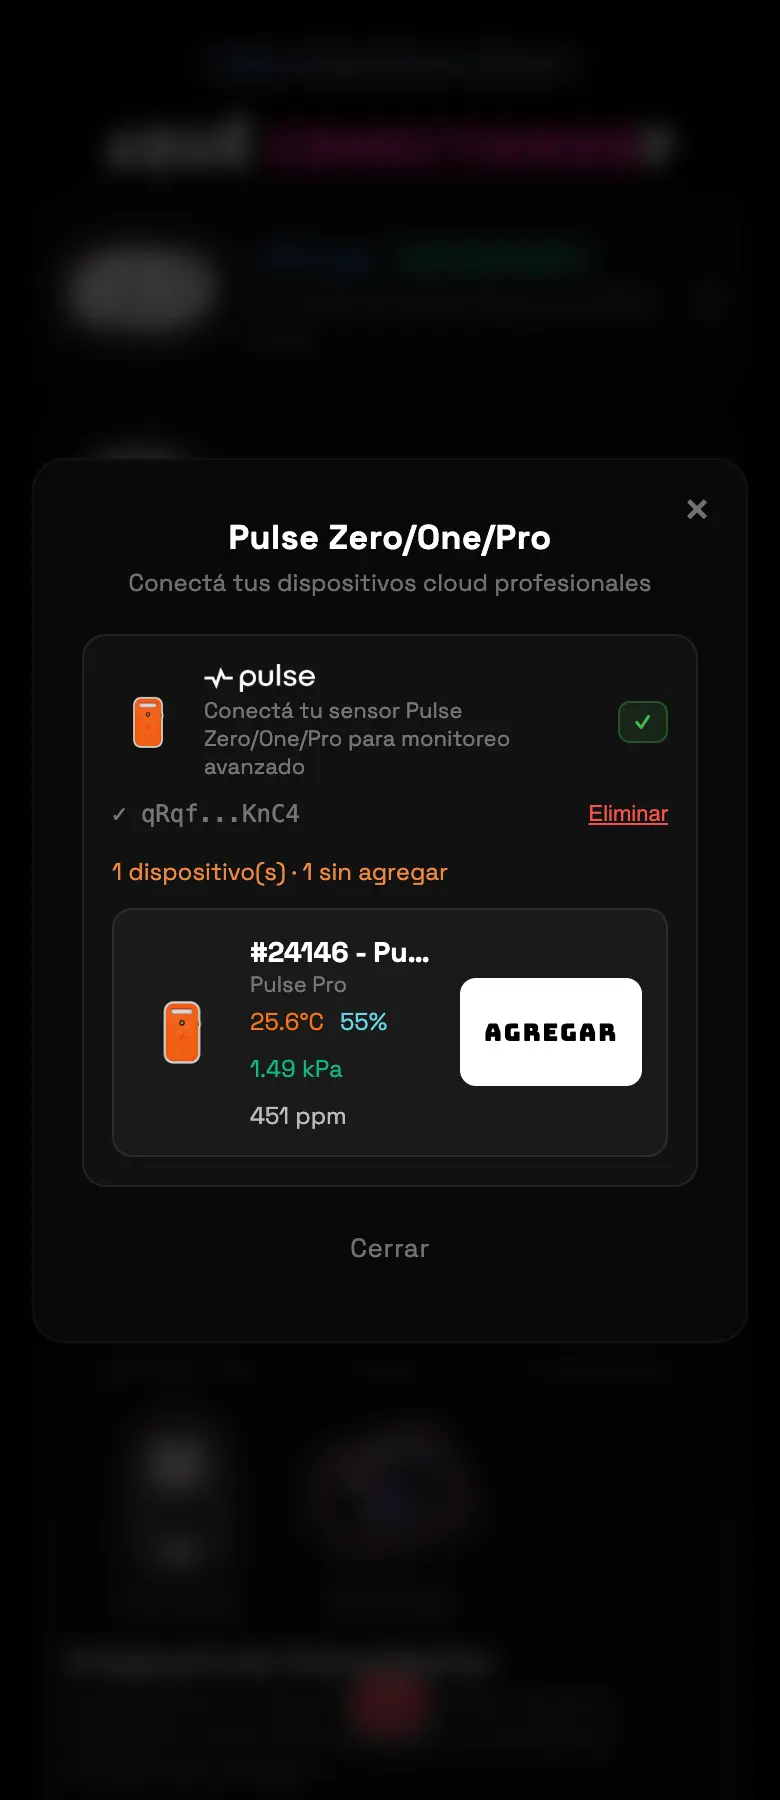
01Sign in to your account on the Pulse portal and copy the API key.
02In Supercycler, pick Pulse, paste the key and confirm.
03The list of your Pulse units shows up on its own. Assign them to the right zone.
FIG 06 · One key and you're done.
Do this
Mark one as the zone's primary sensor: that's where the dashboard numbers come from.
Avoid this
Don't expect it to drive an exhaust fan. It's an expensive thermometer, not an actuator.
How urgent it is
EssentialKey entered and sensor assigned to the zone.
ImportantMarked as primary if it's the only one.
OptionalSpectrum, if it's a Pro.
08 · BluelabINTERMEDIATE
Bluelab Connect
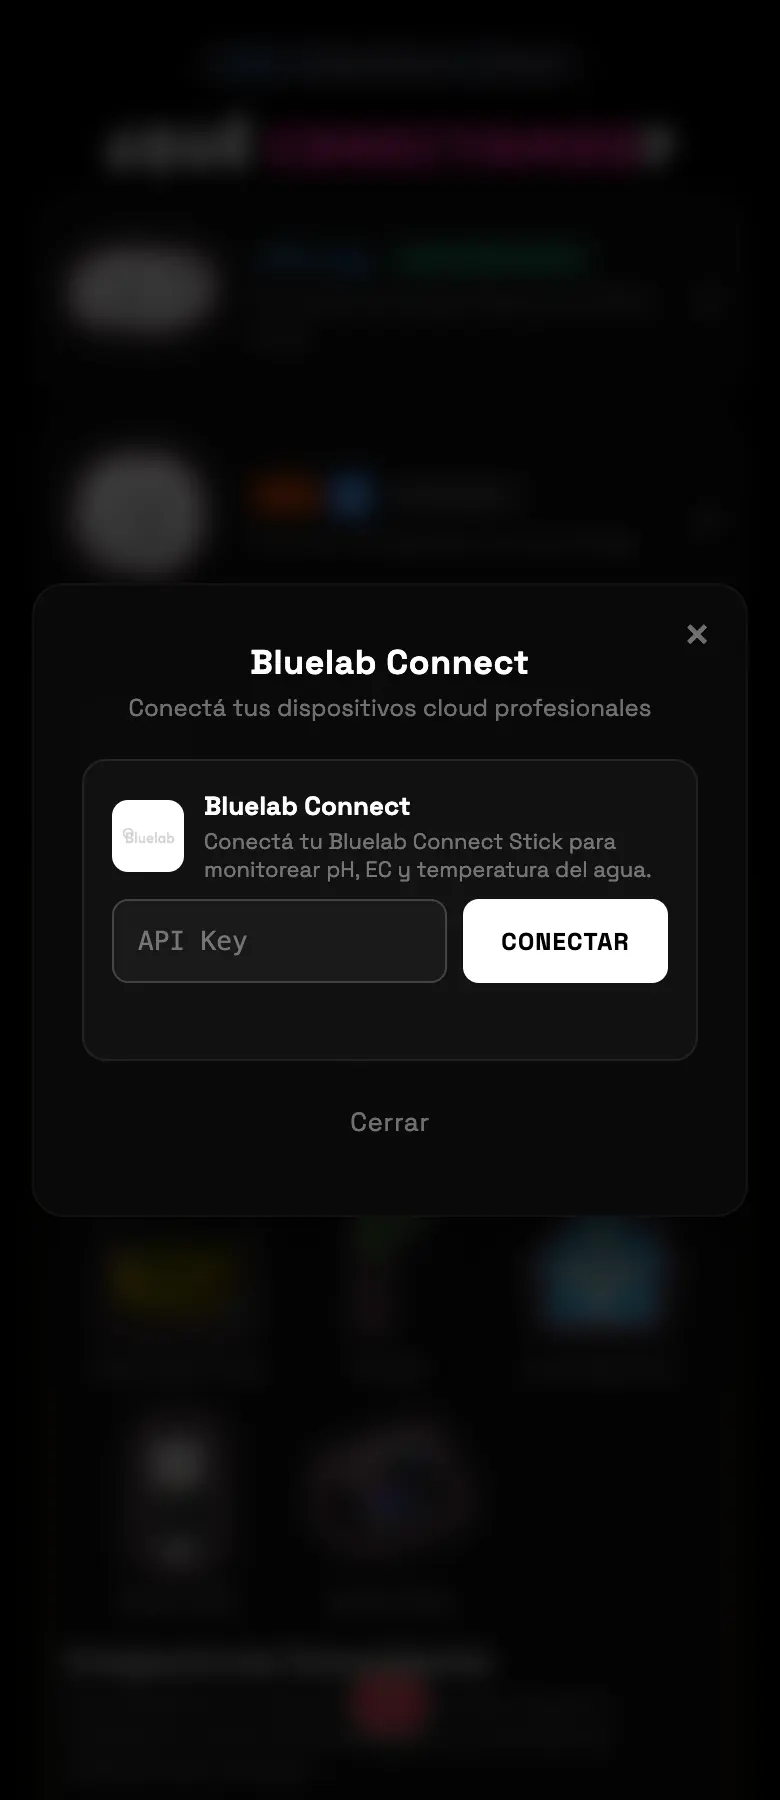
It brings you the pH, the conductivity and the temperature of your water. With that, watering stops when the water goes out of range. Setup saves the key and nothing else: it doesn't show you or add any devices from this screen.
01Get the API key from your Bluelab account.
02Pick Bluelab, paste it and save.
03Once the key checks out, the readings start coming in on their own.
FIG 07 · Bluelab setup is just the key.
Do this
Use it if you water hydroponically or if you want watering to stop when the water goes out of range.
Avoid this
Don't add it expecting to control anything. It only measures.
How urgent it is
EssentialNothing: Bluelab is optional.
ImportantA valid key if you water with nutrient solution.
OptionalWater thresholds configured in Irrigation.
09 · TrolMaster ProADVANCED
TrolMaster Pro
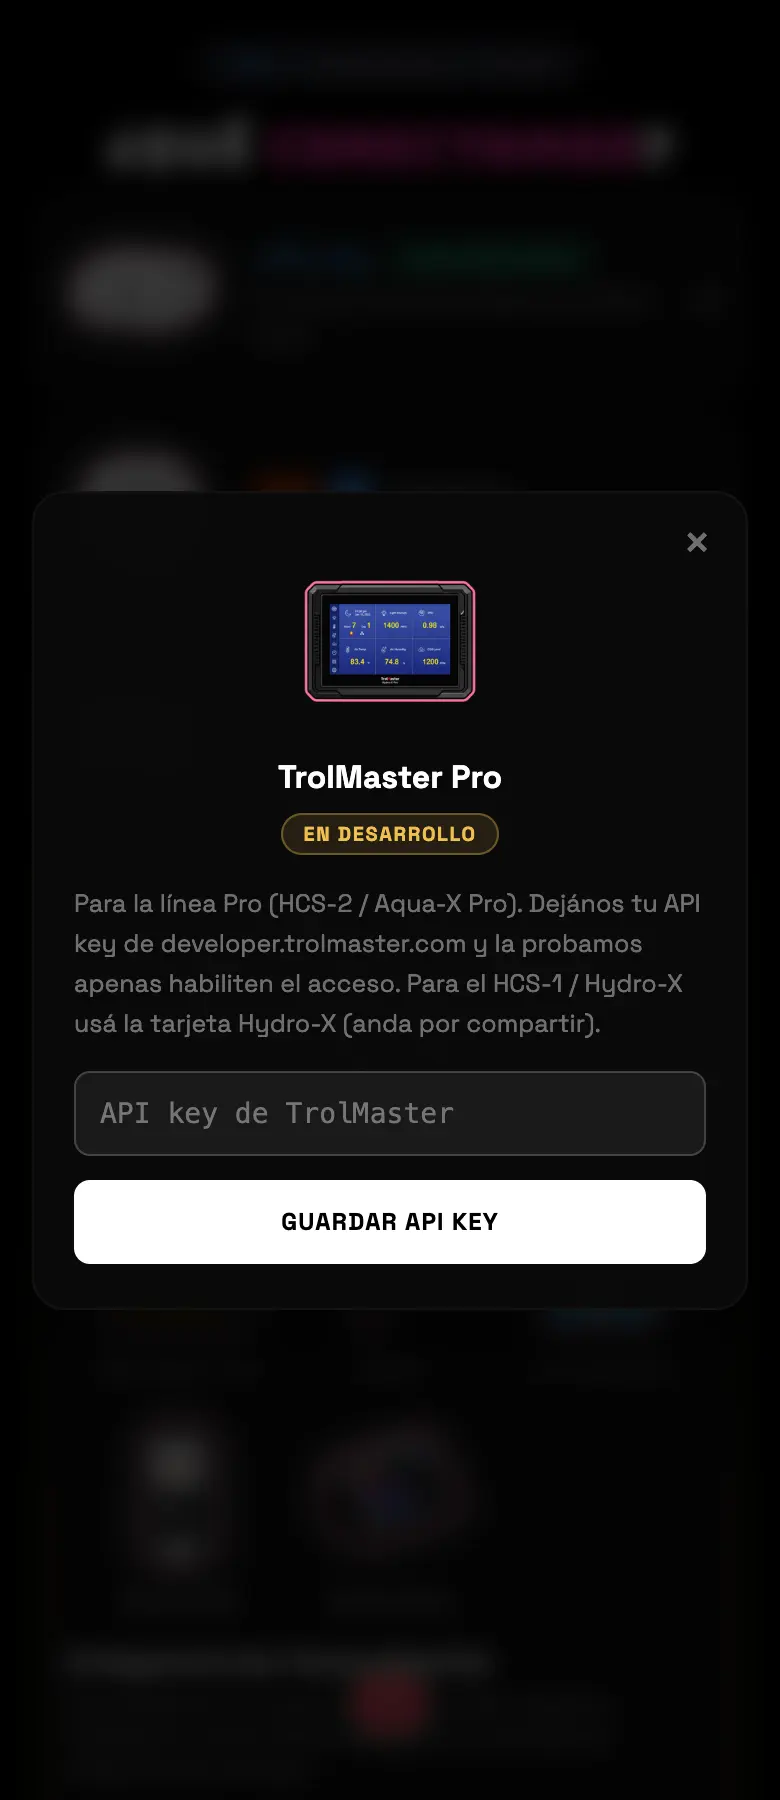
The Pro line — HCS-2, Aqua-X Pro. It's marked In development inside the app itself: today it saves your key and waits for TrolMaster to enable access. It doesn't add any device yet. If you have an HCS-1, a Hydro-X Plus, an NFS-1 or a Hydro-X, the path is the other card, the community one.
01Get your API key at developer.trolmaster.com.
02Pick TrolMaster Pro, paste it and save.
03It stays saved. When TrolMaster opens up access, it turns on by itself.
FIG 08 · The “In development” badge is part of the screen, not an error.
Do this
If you have an HCS-1, a Hydro-X or a Hydro-X Plus, skip this card and use the community one.
Avoid this
Don't expect to see devices after you enter the key: they don't come through yet.
How urgent it is
EssentialNone of this is essential.
ImportantUse the community card if you have a Hydro-X or a Hydro-X Plus.
OptionalLeave the key saved for when it gets enabled.
10 · EyesINTERMEDIATE
Supercycler Eyes (the camera)
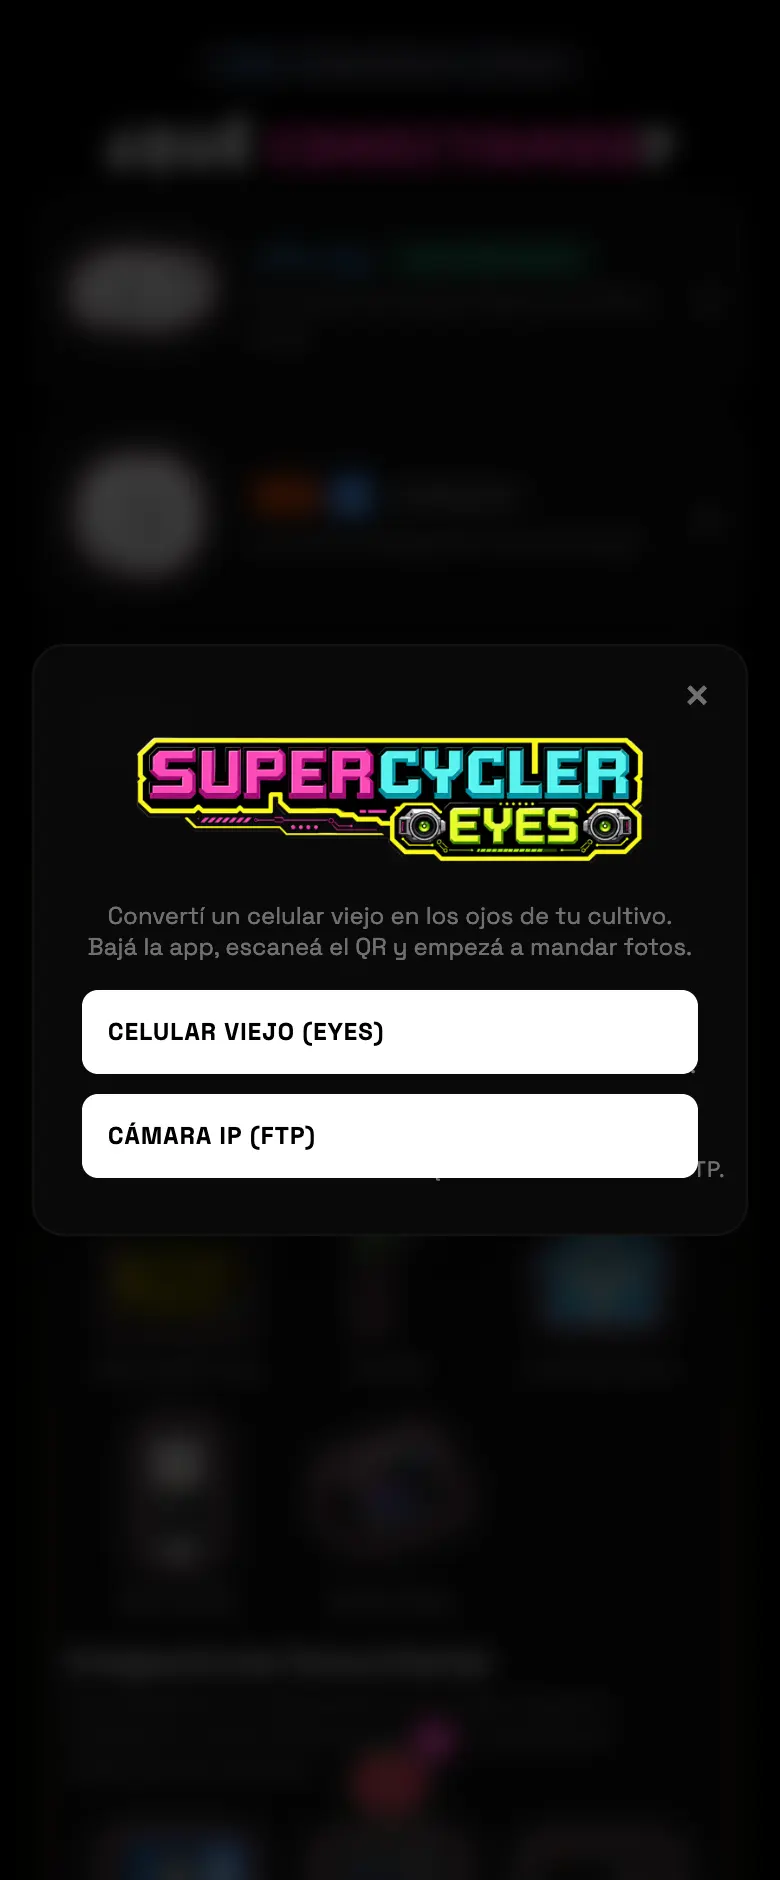
Turn an old phone into a grow camera, or hook up an IP camera over FTP. That's where the timelapse with the numbers on top, the plant count and the light-leak detection come from. One camera per zone: if you assign another one, the previous one is freed up.
01Pick Supercycler Eyes and choose the path: phone or IP camera.
02With a phone: download the Eyes app using the QR code on screen, give the camera a name, and scan the pairing QR code from the phone that's going to record.
03With an IP camera: the app generates an FTP username and password for you to load into the camera.
04Pick the zone and you're done: the AI EYES card shows up on the dashboard.
FIG 09 · The two paths: a phone with the app, or an IP camera over FTP.
Do this
Leave the phone plugged into the charger with the screen off. It records anyway.
Avoid this
Don't assign a new camera to a zone that already has one unless you want to lose the previous one.
How urgent it is
EssentialNone of this is essential.
ImportantOne camera per tent if you want a timelapse.
OptionalLight-leak detection.
11 · EcowittINTERMEDIATE
Ecowitt
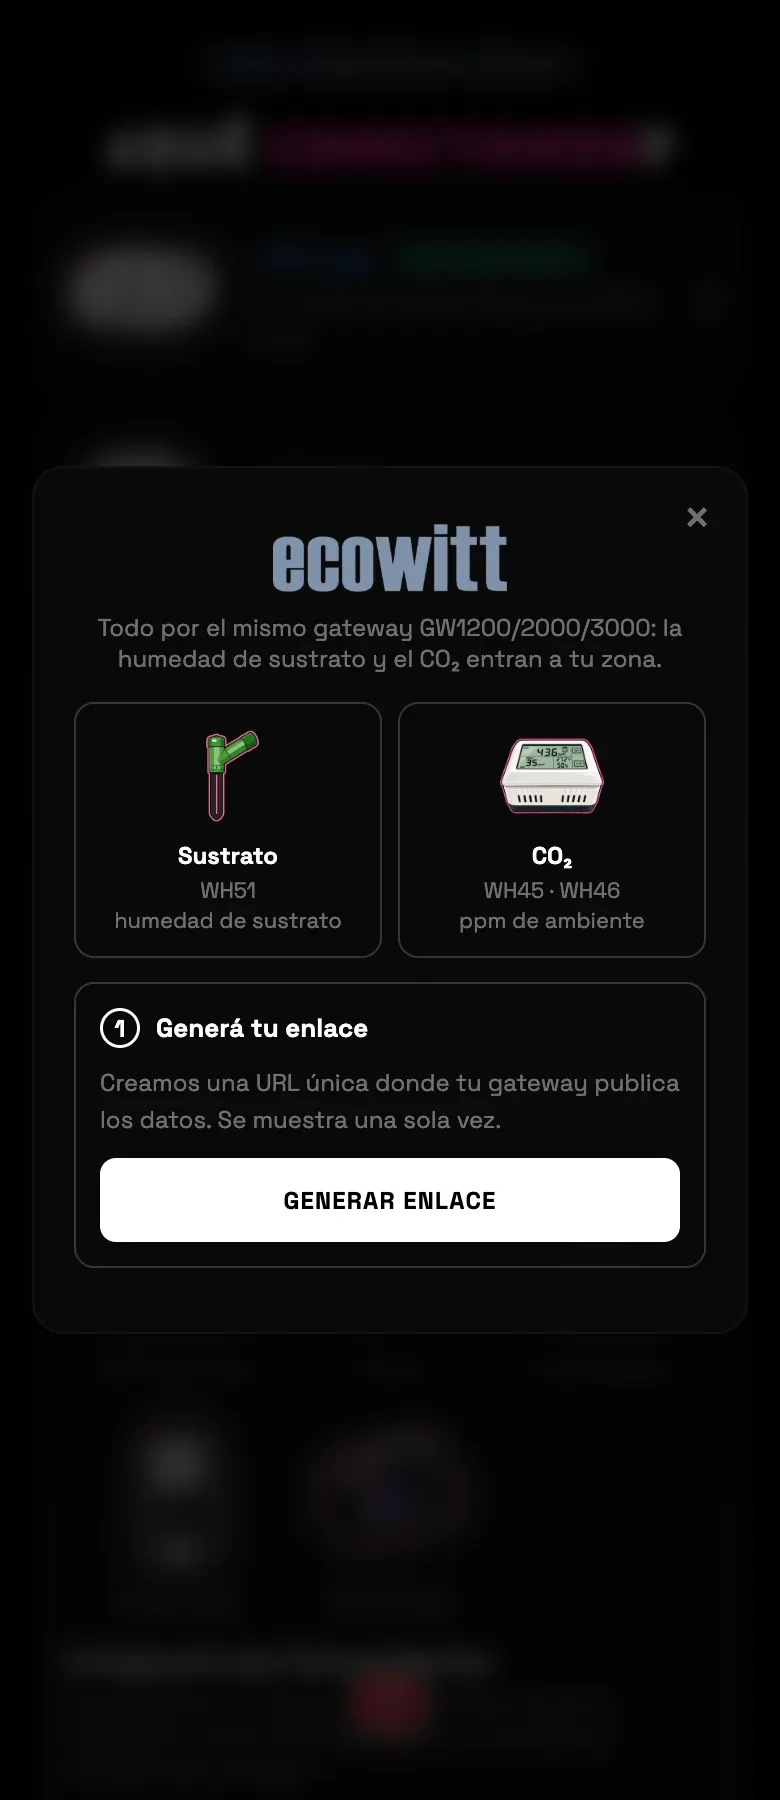
Substrate moisture (WH51) and CO₂ (WH45/WH46) probes, all through the same GW1200/2000/3000 gateway. It's the cheapest way to get soil moisture in. Setup doesn't go through a username and password: you load one of our addresses into the gateway so it sends us the data at the same time as its own cloud.
01Pick Ecowitt and tap Generate link. It gives you an address, a port and an interval.
02Open WS View Plus on your phone — the gateway's setup app, not ecowitt.net.
03Go to Weather Services → Customized and enter the values exactly as the app gave them to you.
04Go back to Supercycler: the screen waits for the first data point and tells you when it arrives.
05Assign each detected probe to its zone.
FIG 10 · Setting up Ecowitt starts by generating the address you load into the gateway.
Do this
Set the gateway up from WS View Plus with your phone right next to the device.
Avoid this
Don't cancel the registration once it says “Hub connected”. You're one step away.
How urgent it is
EssentialNone of this is essential.
ImportantSubstrate moisture if you water automatically.
OptionalCO₂.
12 · Home AssistantADVANCED
Home Assistant
Brings everything you already have set up in Home Assistant to the Dashboard. It's read-only: the sensors and states come in, but Supercycler does not control HA equipment. It's that way on purpose — we don't want to promise you watering we can't guarantee.
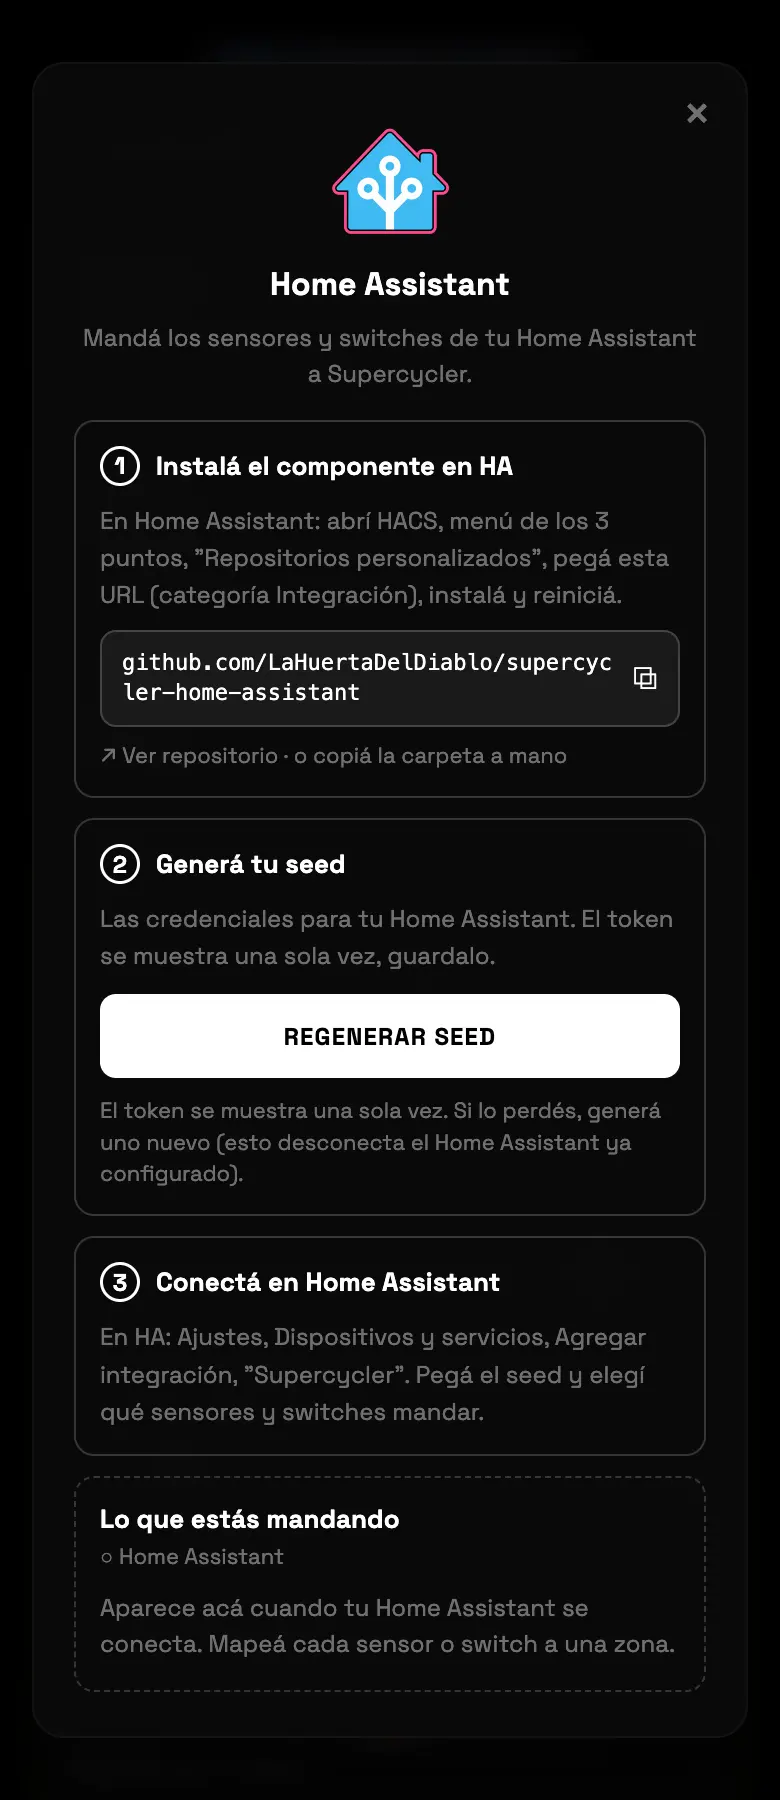
01In Home Assistant open HACS → Custom repositories, paste the address the screen gives you, category Integration, install and restart.
02Go back to Supercycler and tap the button that generates the configuration. It gives you a string.
03In HA: Settings → Devices & services → Add integration → Supercycler, and paste that string.
04The entities start showing up. Assign each one to its zone, or combine it with equipment you already have.
FIG 11 · Step 1 happens on the Home Assistant side, with HACS.
Do this
Use it to bring in sensors you already have running, without buying new hardware.
Avoid this
Don't build your irrigation on an HA switch: the command won't go out.
How urgent it is
EssentialNone of this is essential.
ImportantSensors mapped to the right zone.
OptionalCombining entities with existing equipment.
13 · Brain ESP32ADVANCED
Brain ESP32 (your own board)
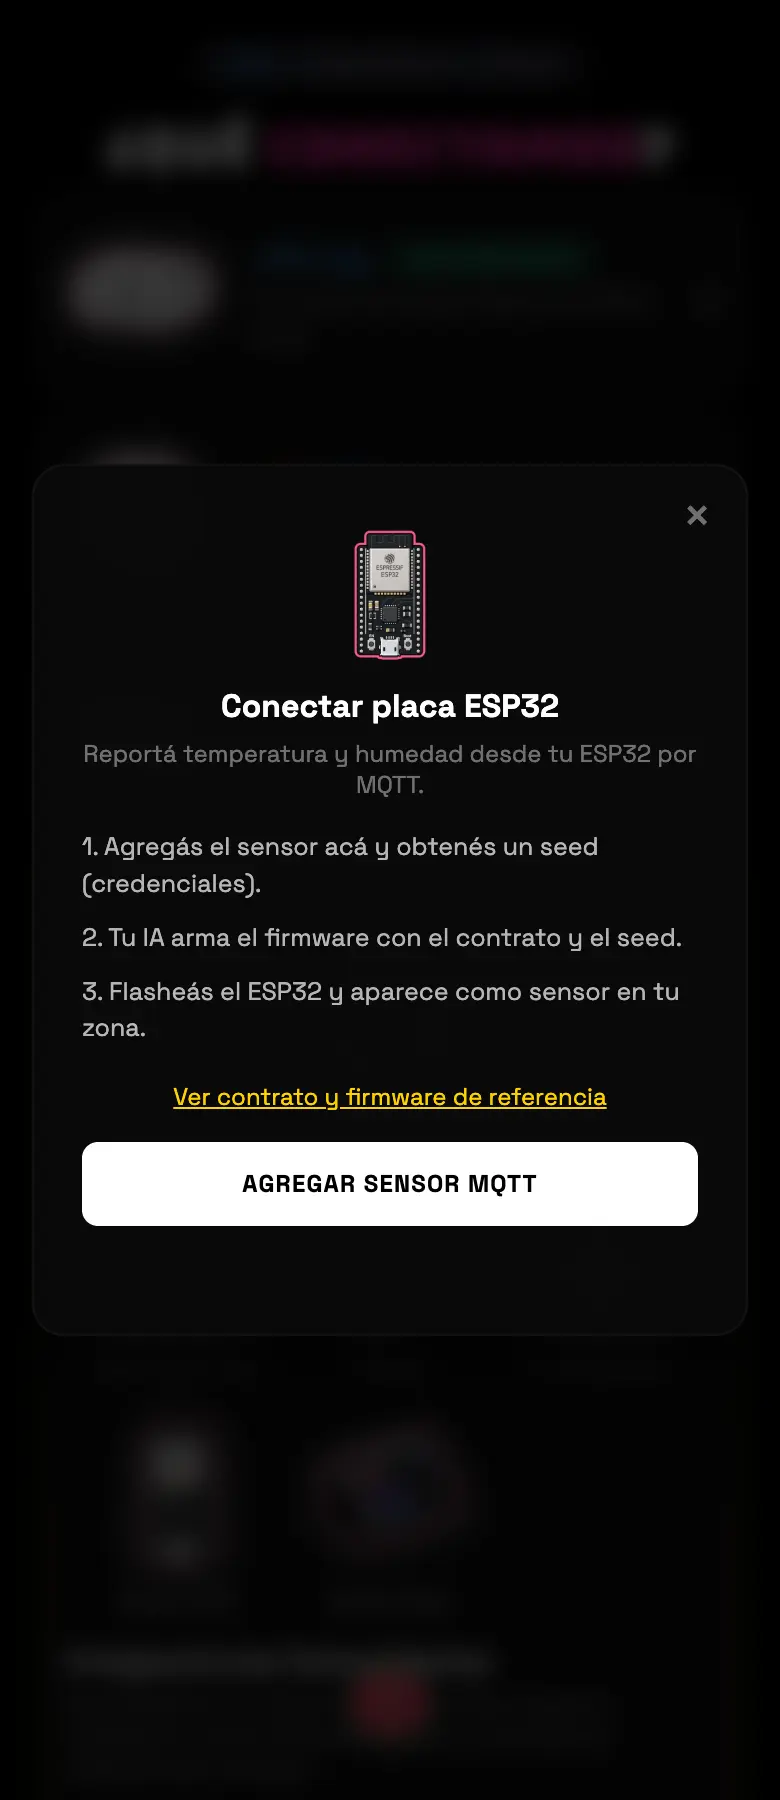
For anyone building their own hardware. We give you everything the board has to speak written out, a reference firmware for ESP32 and ready-made credentials. It reads and it actuates, without depending on any brand's cloud.
01Pick Brain ESP32. From there you can download the contract and the sample firmware.
02Tap create board: it generates a credentials file ready to paste into your code.
03Flash the firmware onto the board with those credentials.
04When the board connects, the screen detects it on its own and lets you assign it to a zone.
FIG 12 · Setting up your own board, with the contract and the reference firmware.
Do this
Start with the reference firmware and only modify it afterward.
Avoid this
Don't publish the credentials file in a repository: it's the key to your board.
How urgent it is
EssentialNone of this is essential.
ImportantCredentials saved.
OptionalYour own firmware.
14 · Stream DeckINTERMEDIATE
Stream Deck (Elgato)
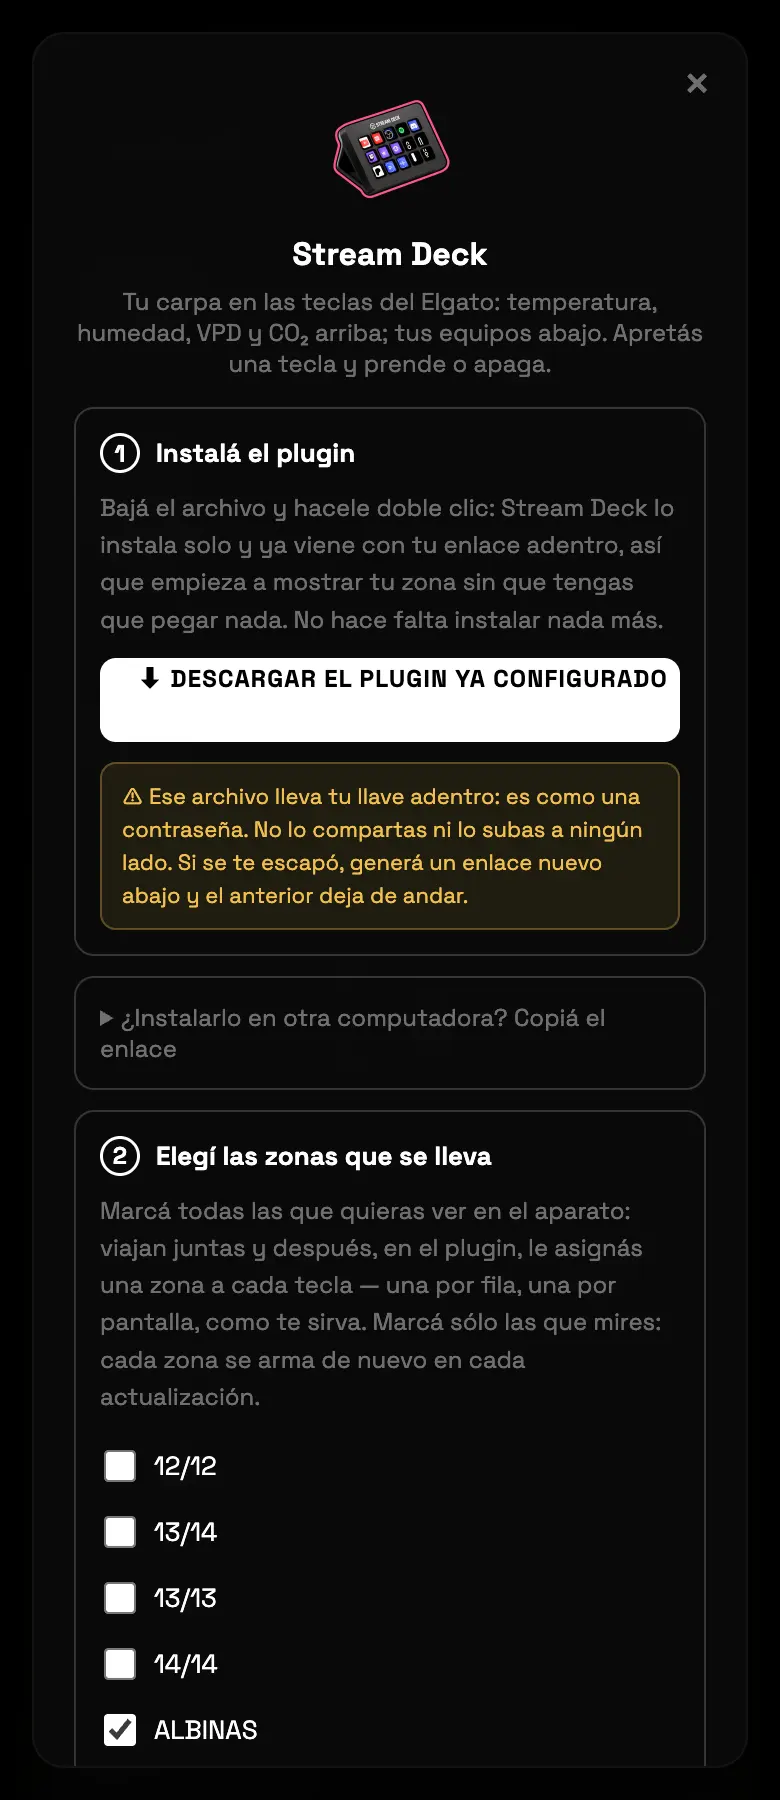
Your tent on the Elgato keys: temperature, humidity, VPD and CO₂ on top; the equipment below. Press a key and it turns on or off. Up to 8 zones.
01Pick Stream Deck and download the plugin file.
02Double-click it. It installs itself and already comes with your link inside: there's nothing to paste.
03Go back to the screen and check which zones you want to see on the device.
FIG 13 · The plugin downloads already configured with your link.
Do this
Check only the tents you look at every day.
Avoid this
Don't check all eight if you have two: each one slows down the refresh.
How urgent it is
EssentialNone of this is essential.
ImportantAt least one zone checked.
OptionalThe device theme.
15 · TrolMasterADVANCED
TrolMaster Hydro-X
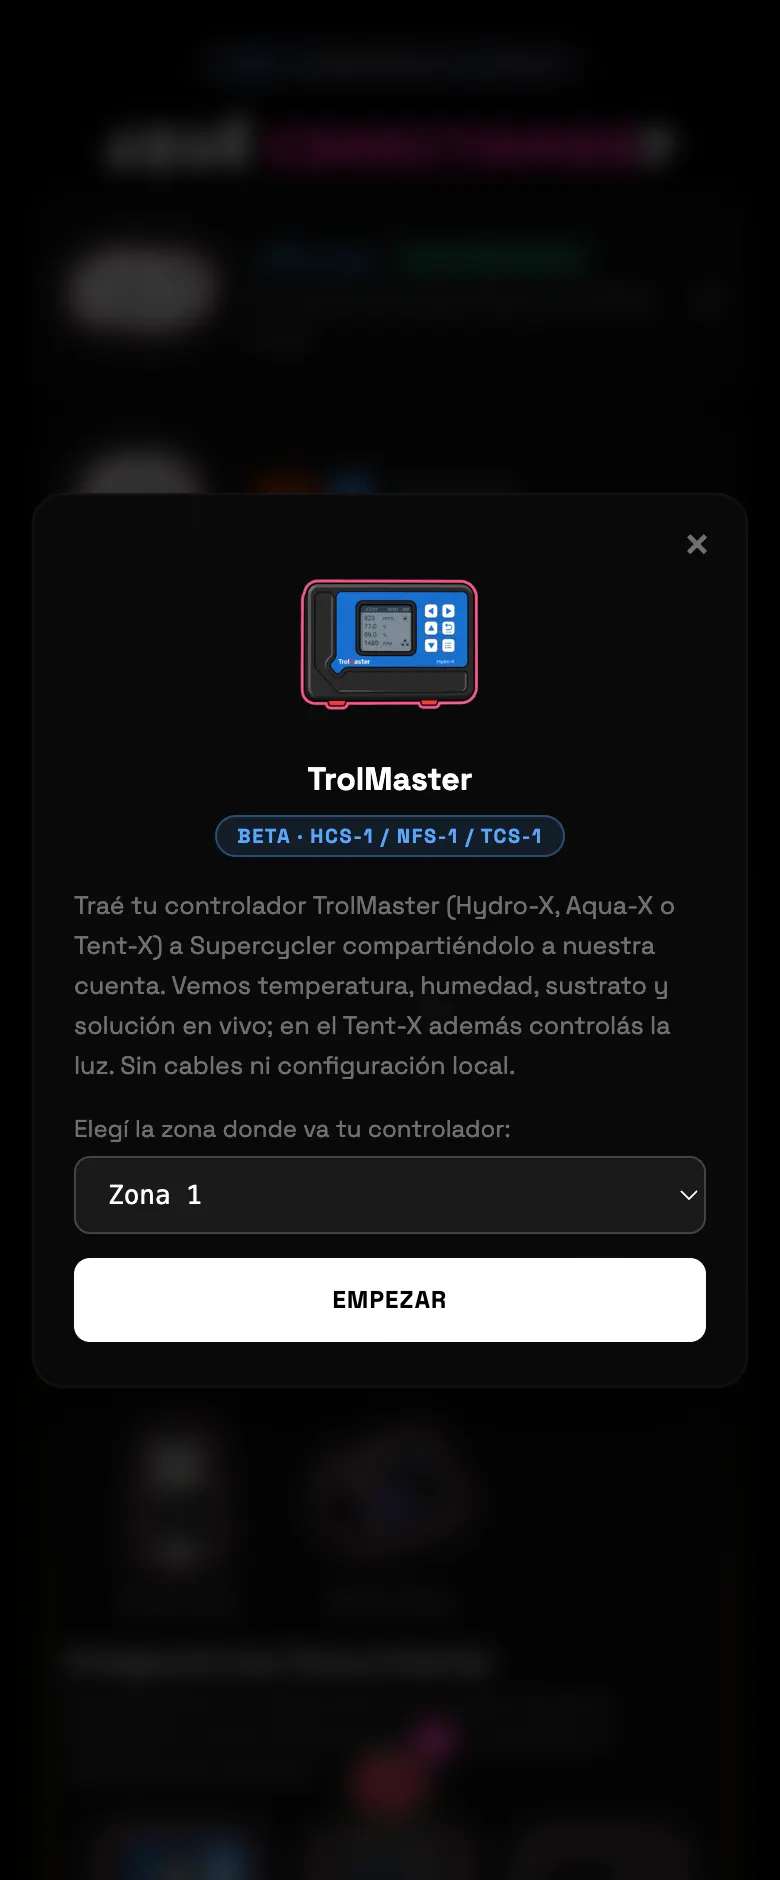
HCS-1, Hydro-X Plus, NFS-1, Aqua-X Plus and TCS-1. TrolMaster's official access is only for the Pro line and it's read-only, so this goes another way: you share the controller with an account of ours, the same way you'd share it with a partner.
01Pick TrolMaster in the community block and pick the zone.
02Open the TrolMaster app and share the controller with trolmaster@supercycler.app, with the Editor role. The screen includes both screenshots of where to tap.
03Go back to Supercycler: it hooks up on its own in a few seconds. If it doesn't, paste the controller's full serial number.
04Once it's linked it shows you the room and the temperature and humidity reading.
FIG 14 · Setup goes through sharing the controller from the manufacturer's app.
Common errors
What you see
What happened
What to do
"We don't see it yet"
The share hasn't come through yet
Wait a few seconds and retry, or use the serial
"You have several controllers with that email"
You shared more than one
Tell it apart with the serial number
"Already linked"
It's on another Supercycler account
Remove it from the old account first
"That serial doesn't look valid"
It's incomplete
Copy the whole number, no spaces
Do this
Share with the Editor role. Read permission isn't enough to adopt the light.
Avoid this
Don't use the "TrolMaster Pro" card: that one doesn't set anything up yet.
How urgent it is
EssentialNone of this is essential.
ImportantController shared and linked.
OptionalAdopting the TCS-1 light.
16 · Mars HydroINTERMEDIATE
Mars Hydro / MarsPro
Lights and ventilation from the MarsPro app. They come in as Equipment in the zone and really do dim, with a ramp curve. It's one of the most complete community integrations.
01Pick Mars Hydro and log in with your MarsPro username and password.
02The app syncs and shows you your equipment, one card per outlet.
03Assign each outlet to its zone and pick the role.
04Try the test pulse before you finish.
FIG 15 · MarsPro username and password; the password is cleared from the screen once you log in.
Do this
Delete any schedules you have loaded in MarsPro before you set the schedule here.
Avoid this
Don't leave the MarsPro app open on your phone while you're setting things up.
How urgent it is
EssentialNone of this is essential.
ImportantThe light assigned with its role.
OptionalThe ramp curve.
17 · Spider FarmerINTERMEDIATE
Spider Farmer
It works just like Mars Hydro, with a different brand. It adds the SF-GGS-CB environment monitor. It dims per output, and it takes the role from the name the outlet already has in the firmware: it doesn't ask you.
01Pick Spider Farmer and log in with the app's username and password.
02Assign the environment controller to its zone.
03Assign each outlet separately. Setting up one outlet takes about 15 seconds.
FIG 16 · Logging in with the manufacturer's account.
Do this
Wait out the 15 seconds of the setup without touching anything: it's talking to the device.
Avoid this
Don't go looking for the role menu for the outlets: it comes from the firmware and you're never asked.
The UIS family: controllers and outlets. The ambient sensor comes in and the outlets come in. Watch out with dimming — the outlets are relays: they turn on or off. The only exception is the Controller 89 ("AI+"), which does dim.
01Pick AC Infinity and sign in with your app username and password.
02Assign the ambient sensor to its zone: that one comes in as a sensor and doesn't ask for a role.
03Assign each outlet. Those do ask for a role.
04If the outlet is a light, the same schedule editor any plug uses opens up.
FIG 17 · Setup with the manufacturer's account.
Do this
The zone you pick stays set for the next outlet: you don't have to pick it again for each one.
Avoid this
Don't count on dimming unless you have the Controller 89.
How urgent it is
EssentialNone of this is essential.
ImportantAmbient sensor and outlets in the right zone.
OptionalSchedule on the light outlet.
19 · VIVOSUNINTERMEDIATE
VIVOSUN GrowHub E42A+
The community integration that lets you control the most: you adopt the environment sensor, the dimmable light output and the two variable-speed fans. It's the only brand on the whole list that controls a fan's speed today.
01Pick VIVOSUN and log in with the app's username and password.
02Adopt whatever you want separately: the environment probe, the light output, and each fan.
03Assign everything to the zone it belongs to.
FIG 18 · Setup with the manufacturer's account.
Do this
Adopt both environment probes if you have them: they feed the zone's heat map.
Avoid this
Don't take it for granted that the fan is spinning just because the number says so.
How urgent it is
EssentialNone of this is essential.
ImportantThe light and the environment sensor adopted.
OptionalThe variable-speed fans.
20 · PurplADVANCED
Purpl Pro (THC / CBD)
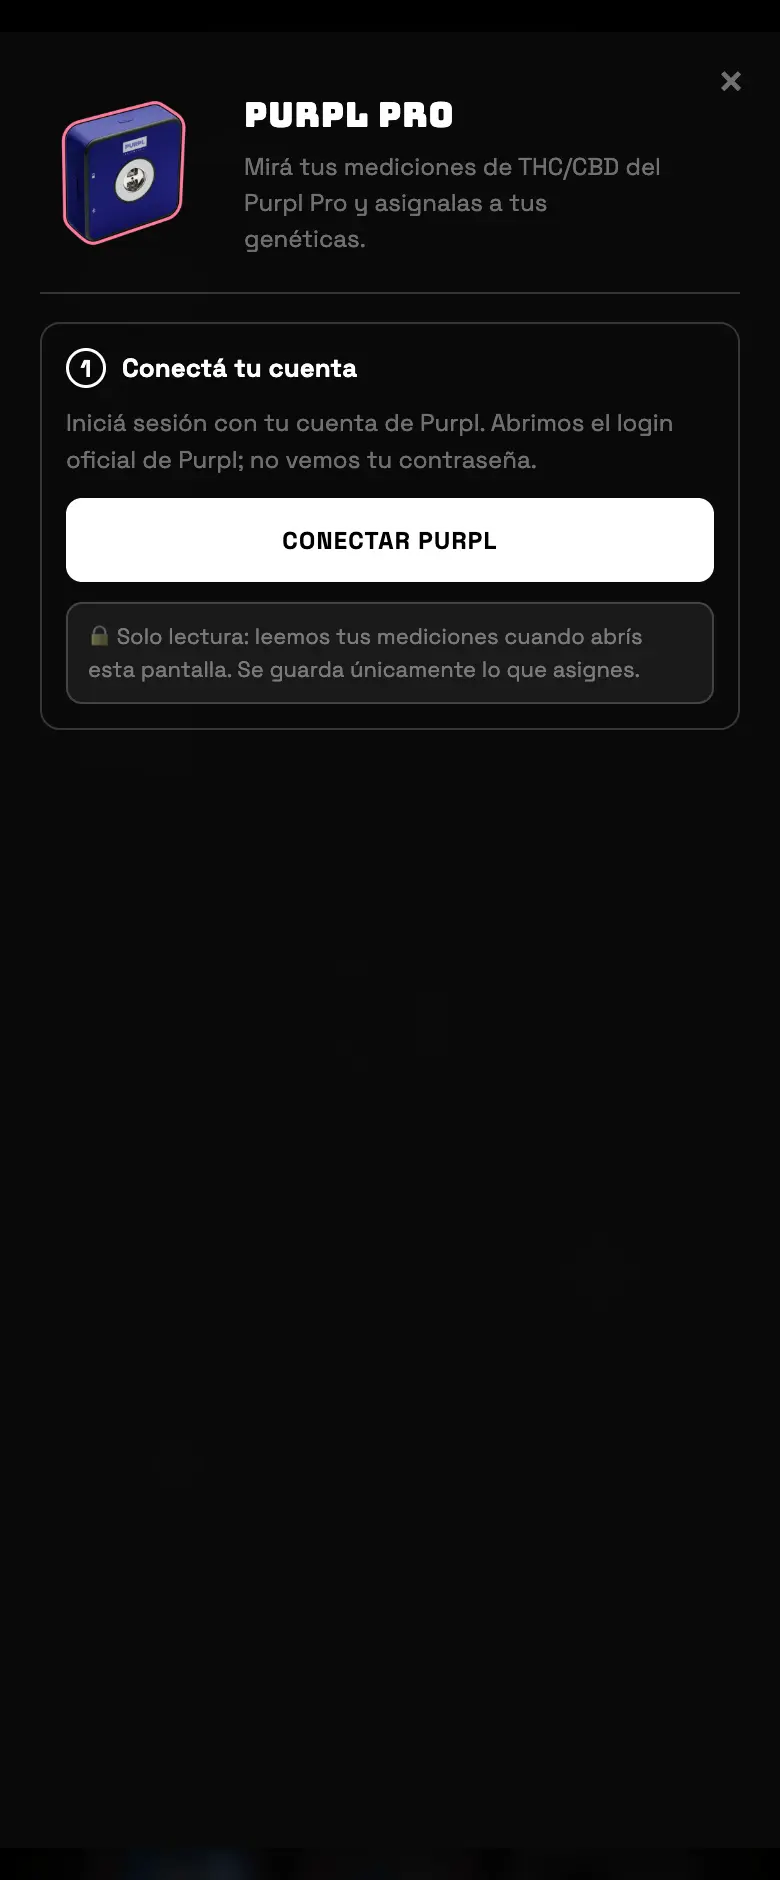
Potency meter. It brings in your THC and CBD measurements and lets you attach them to a genetics in the grow. Read-only, and it only works from the phone app: it has to go in through the Purpl screen, which only lives inside the app.
01From the app, pick Purpl Pro and tap connect.
02The official Purpl login opens. Sign in with your account.
03You come back with your measurement history, read live from their cloud.
04Pick a measurement and assign it to a genetics, or save it as a note.
FIG 19 · The history is read from the Purpl cloud; only what you assign gets saved.
Do this
Assign the measurement to the real genetics: that's what shows up later in the grow close-out.
Avoid this
Don't expect it to be saved just by looking at it. It gets saved when you assign it.
How urgent it is
EssentialNone of this is essential.
ImportantMeasurements assigned to their genetics.
OptionalLoose notes.
21 · VABIRAADVANCED
VABIRA VBR-100 Plus (PAR meter)
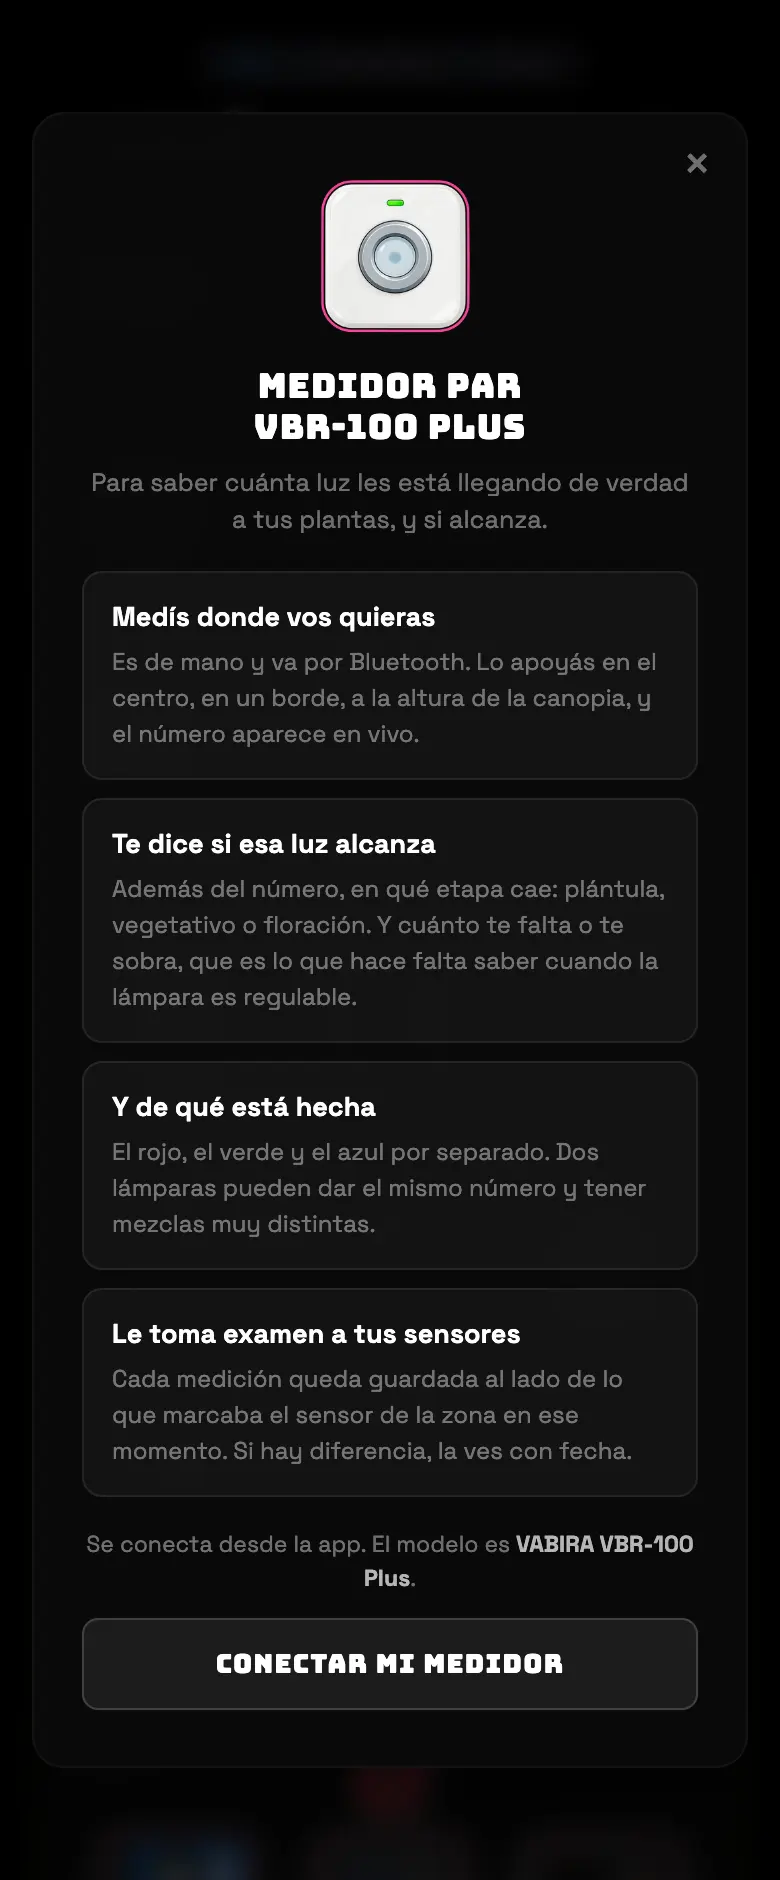
A handheld light meter, over Bluetooth, not a fixed piece of tent equipment. It's for knowing how much light actually reaches the plants and whether it's enough for the stage. The card on the connection screen only explains it to you: the actual setup is in GROW TOOLS, inside the app.
01From the app, ☰ menu → GROW TOOLS → PAR measurement.
02Turn on your phone's Bluetooth and location.
03Pair the meter and start measuring wherever you want.
FIG 20 · The card on the connection screen explains it; the actual setup lives in GROW TOOLS.
Do this
Measure at canopy height, at several points, and write down where.
Avoid this
Don't look for it on the connection screen: setup isn't there.
How urgent it is
EssentialNone of this is essential.
ImportantBluetooth and location turned on.
OptionalComparing against the zone's sensors.
22 · Aqua MasterINTERMEDIATE
Aqua Master C800
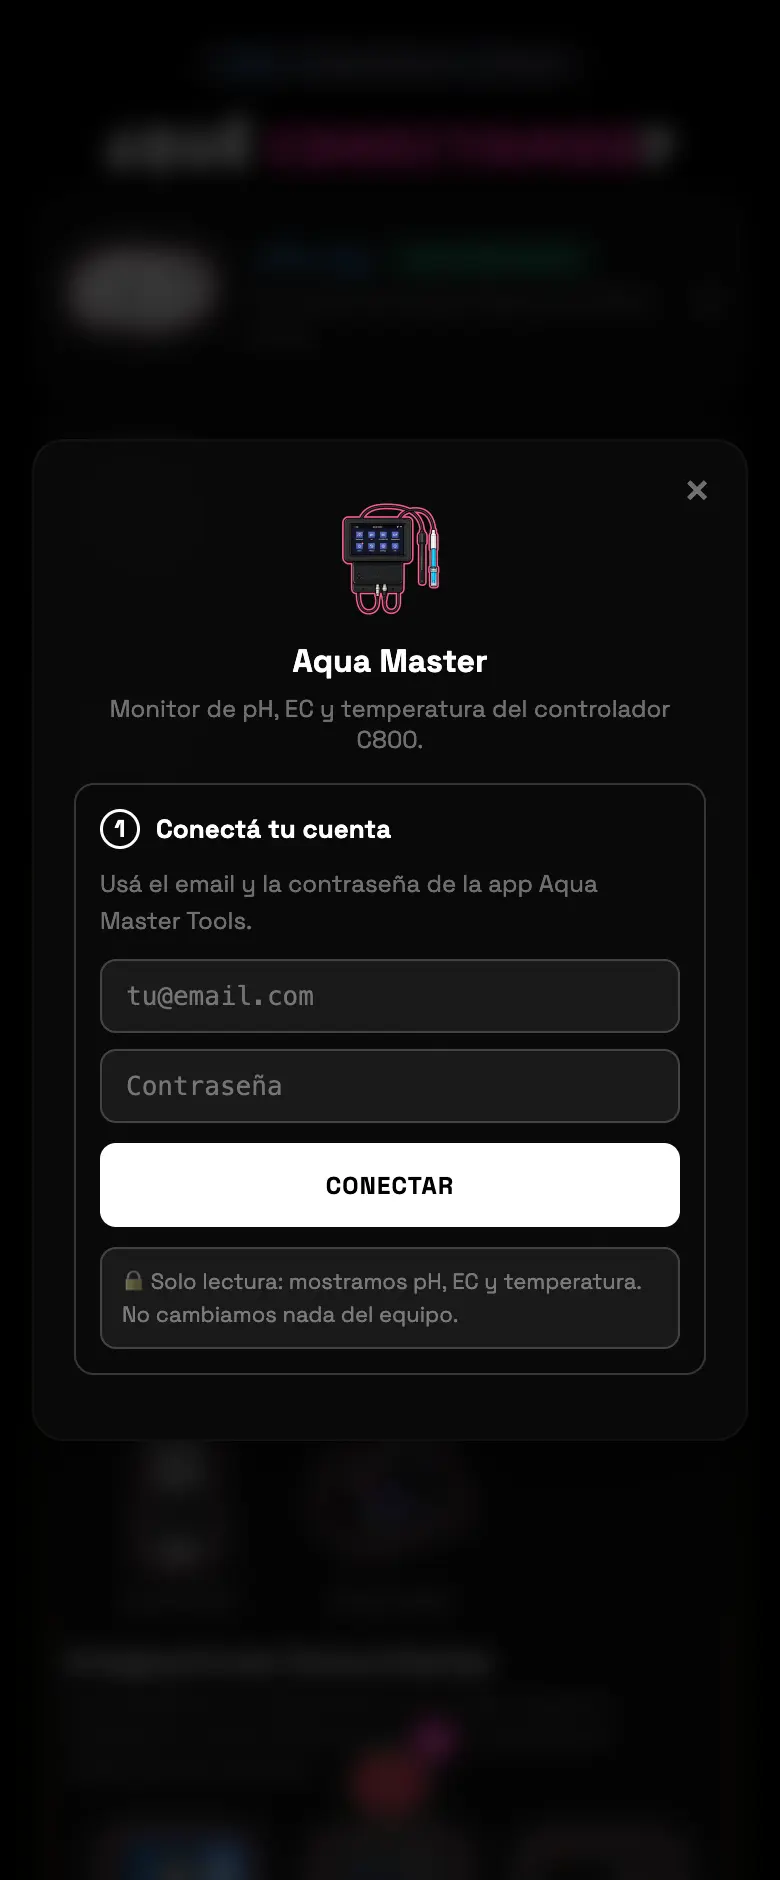
pH, conductivity and water temperature, on its own card on the dashboard. Read-only: we don't change anything on the device.
01Pick Aqua Master and sign in with your Aqua Master Tools username and password.
02Assign the controller to its zone.
03The AQUA MASTER card shows up on the dashboard with the three numbers.
FIG 21 · Setup with the manufacturer's account.
Do this
Use it together with the watering lockout for out-of-range water.
Avoid this
Don't expect to calibrate it or change anything on it from here.
How urgent it is
EssentialNone of this is essential.
ImportantAssigned to the right zone.
OptionalWater thresholds in Irrigation.
23 · VivoKeyADVANCED
VivoKey Spark 2 implant
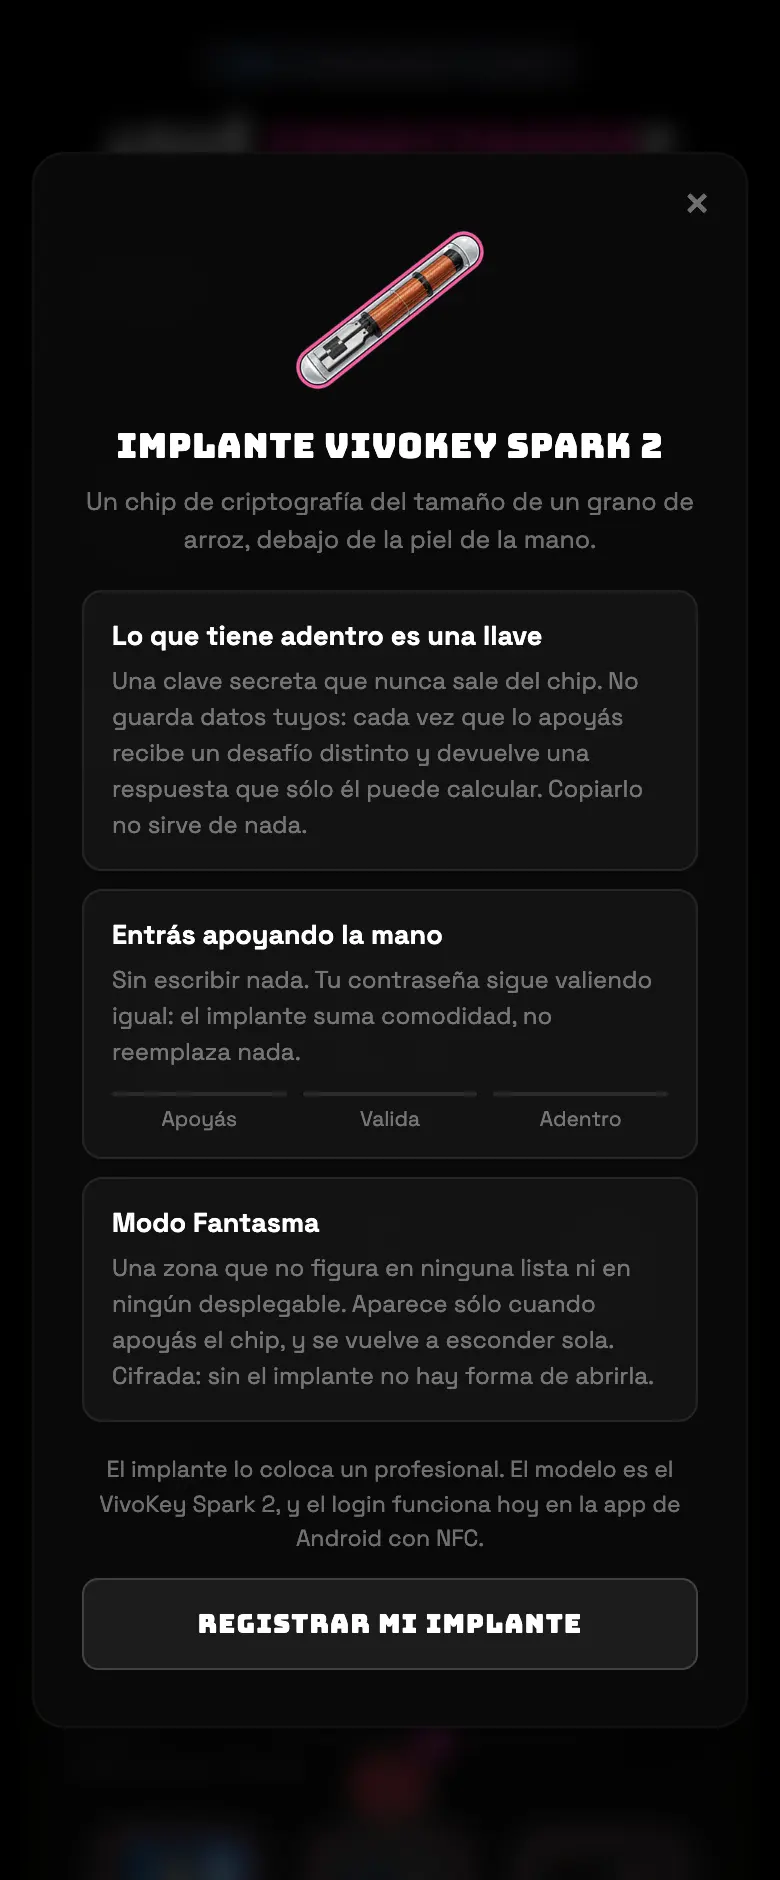
It isn't a piece of equipment in the tent: it's a way to log into the app by resting your hand on the phone. A chip the size of a grain of rice, under the skin, with a key that never leaves it. The card on the connection screen explains it; the setup is in the menu.
01From the app on Android with NFC, ☰ menu → Settings → My implant.
02Follow the setup by resting your hand on the phone's reader.
FIG 22 · The card explains the chip; the actual setup is in the Settings menu.
Do this
Use it as a convenient second factor, not as your only way in.
Avoid this
Don't rely on the implant alone: keep your password saved too.
How urgent it is
EssentialNone of this is essential.
ImportantYour password saved anyway.
OptionalThe implant.
24 · No hardwareBASIC
I don't have any plug yet
You can use Supercycler without buying anything. Manual light lets you enter the schedule you already run by hand: the app keeps the grow clock, the day, the stage and the tasks, and tells you when to flip the switch. When you buy the plug, you move to automatic without losing the history.
01Come in through the welcome screen and pick I want to try it without hardware.
02Enter your light's schedule: how many hours on and how many off.
03The app tells you when it's time. You turn it off and on.
Do this
Enter the schedule even if you switch it on by hand: that's where the grow day and the tasks come from.
Avoid this
Don't leave watering unsupervised if you don't have hardware that can shut off the water.
How urgent it is
EssentialSchedule entered.
ImportantManual light alarm active.
OptionalBuying the first plug.
25 · When it failsBASIC
My device doesn't show up
The five reasons behind almost every setup that doesn't go through. Before you retry ten times, go through this list.
It's on another Supercycler account
A device belongs to one account only. If it shows up flagged in red as already registered, you have to delete it from the old account first.
You hit your plan's limit
The strip at the top tells you how many devices and zones you have left. Once it's full, the next setup stops with a warning.
It's offline in the manufacturer's app
If it shows as disconnected in the Tuya, eWeLink or MarsPro app, we won't see it either. That gets fixed on the manufacturer's side.
The local scan needs the app and the same network
Scanning for Shelly over WiFi only works from the installed app and with your phone on the same network as the device.
The manufacturer's cloud quota ran out
It happens with eWeLink and with Tuya. Equipment that's already connected keeps working; what stops is adding new ones. It resets on its own.
If it still doesn't work
Try the on and off button from the manufacturer's app. If it doesn't respond there either, the problem isn't Supercycler.
Check that the WiFi is 2.4 GHz: almost no smart plug speaks 5 GHz.
Open a ticket from the ☰ menu → Support. Tell us what you expected, what happened and since when — that gets it solved much faster.
Do this
Write down the exact model before you contact support. The brand alone isn't enough.
Avoid this
Don't retry the setup ten times in a row: if it's a quota problem, every attempt makes it worse.
How urgent it is
EssentialCheck that the device is online in its own app.
ImportantCheck the plan limit and the 2.4 GHz network.
OptionalOpen a ticket with the exact model.
The real Brain reads your sensors
This manual explains the app. Brain, inside it, answers about your tent: why your VPD spiked last night, whether that dryback is normal, what to change today.